Welcome to a tutorial on how to create a video call app using Javascript and WebRTC. For the uninitiated, that is “Web Real-Time Communication”. Yes, it is possible to access the webcam with Javascript, and even make peer-to-peer connections for a live video call. Read on for the example!
TABLE OF CONTENTS
DOWNLOAD & NOTES
Here is the download link to the example code, so you don’t have to copy-paste everything.
EXAMPLE CODE DOWNLOAD
Just click on “download zip” or do a git clone. I have released it under the MIT license, so feel free to build on top of it or use it in your own project.
SORRY FOR THE ADS...
But someone has to pay the bills, and sponsors are paying for it. I insist on not turning Code Boxx into a "paid scripts" business, and I don't "block people with Adblock". Every little bit of support helps.
Buy Me A Coffee Code Boxx eBooks
TEST SETUP
Before we get into the scripts, here is a section to walk through my local test setup. Yes, some setup is required, and it is not straightforward.
SETUP OVERVIEW
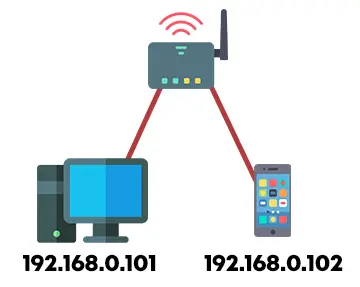
To test a video call app, you will need at least 2 devices. In my case, I use a server and a smartphone.
- Server – NodeJS installed, with a webcam attached.
- Smartphone – Android or iOS, does not quite matter. So long as it has a camera and a good browser.
- Of course, both devices are connected to the same home network.
If you don’t have 2 devices, you will have to find some funky ways to “split” your computer into two devices. Maybe two different browsers, a virtual machine, or an Android emulator. But not so sure if they can share one webcam.
SSL CERTIFICATE & SERVER SETUP
For the next headache, an SSL cert is required for testing. For those who are new, https:// is required for Javascript to get access permission to the webcam and microphone. So for this test setup, I got lazy and just used an online SSL cert generator.
Please get a proper SSL cert and don’t use a self-signed certificate on a live server.
DEPLOYMENT & TESTING
- Set the SSL cert in
1-server.jsto your own. - Change the server IP address in
assets/3-vid-chat.jsto your own. - Run
npm i peer expressin your project folder to install the required modules. - Run
node 1-server.js. - Access
https://YOUR-SERVER-IP-ADDRESS/in 2 different devices.
The browser or anti-virus will complain something about an “unsafe connection” if you use a self-signed cert. No sh*t Sherlock, it’s self-signed. Just hit “continue to the website”.
JAVASCRIPT VIDEO CALL
All right, let us now get into more details on how to create a Javascript video call app.
PART 1) NODEJS SERVER
// (A) LOAD MODULES
const http = require("http");
const https = require("https");
const express = require("express");
const peer = require("peer");
const fs = require("fs");
const path = require("path");

// (B) EXPRESS SERVER
const app = express();

// (C) ROUTES + STATIC FILES
app.use("/assets", express.static(path.join(__dirname, "/assets")));
app.get("/", (req, res) => res.sendFile(path.join(__dirname, "/2-vid-chat.html")));

// (D) HTTPS + PEER SERVER
const httpsServer = https.createServer({
  key: fs.readFileSync(path.join(__dirname, "server.key")),
  cert: fs.readFileSync(path.join(__dirname, "server.crt"))
}, app);
httpsServer.listen(443, () => console.log("HTTPS Server running on port 443"));
app.use("/peer", peer.ExpressPeerServer(httpsServer, { debug : true }));
The NodeJS server-side script should be self-explanatory – Pretty much load the required modules, launch the HTTPS and peer server.
PART 2) HTML VIDEO CALL PAGE
<!-- (A) ENTER NAME -->
<form id="stepA" onsubmit="return vChat.open()">
<label>Enter Your Name</label>
<input type="text" id="nameA" disabled required>
<input type="submit" value="Next">
</form>
<!-- (B) CONNECT TO -->
<form id="stepB" class="hide" onsubmit="return vChat.call()">
<label>Connect to</label>
<input type="text" id="nameB" required>
<div>
Or ask someone to call you - <span id="nameAA"></span>
</div>
<input type="submit" value="Next">
</form>
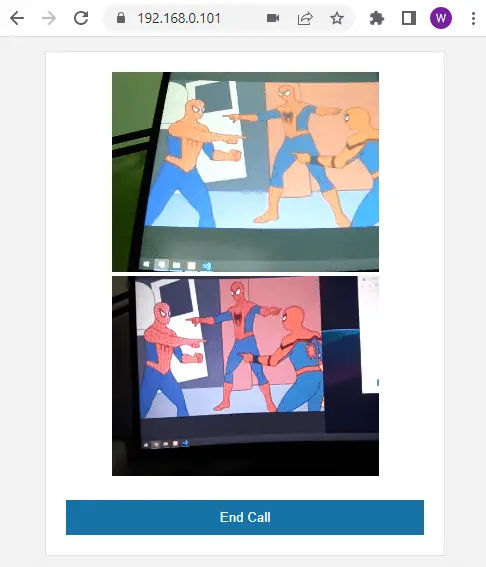
<!-- (C) VIDEO -->
<div id="stepC" class="hide">
<video id="vLocal" muted></video>
<video id="vRemote"></video>
<input type="button" value="End Call" onclick="vChat.endcall()">
</div>For the HTML user interface, we will take a “step-by-step” wizard approach.
- Step 1 – Enter your name.
- Step 2 – Connect to another user, or ask another user to connect.
- Step 3 – The video chat screen.
<video id="vLocal" muted>The user’s webcam feed. Volume is muted to prevent audio feedback.<video id="vRemote">The webcam feed of the other party.
PART 3) THE JAVASCRIPT
3A) INIT
var vChat = {
  // (A) PROPERTIES
  peerOpt : {
    host: "192.168.0.101", // CHANGE TO YOUR OWN!
    port: 443, path: "/peer", secure : true
  },
  peerObj : null, peerCall : null,
  hSteps : null, hNameA : null, hNameB: null,
  hVidL : null, hVidR : null,
  vStream : null,
  // ...
};
Captain Obvious to the rescue, var vChat is an object that contains all the mechanics of the video chat. I will divide the properties into 3 general groups.
peerOpt peerObj peerCallRelated to the Peer Server and PeerJS.hSteps hNameA hNameB hVidL hVidRHTML elements.vStreamThe user’s webcam video stream/live feed.
3B) INIT & HTML INTERFACE
// (B) INIT - GET HTML SECTIONS
init : () => {
  // (B1) GET HTML ELEMENTS
  vChat.hSec = [
    document.getElementById("stepA"),
    document.getElementById("stepB"),
    document.getElementById("stepC")
  ];
  vChat.hNameA = document.getElementById("nameA");
  vChat.hNameB = document.getElementById("nameB");
  vChat.hVidL = document.getElementById("vLocal");
  vChat.hVidR = document.getElementById("vRemote");

  // (B2) GET WEBCAM PERMISSION
  navigator.mediaDevices.getUserMedia({ video: true, audio: true })
  .then(stream => {
    vChat.vStream = stream;
    vChat.hVidL.srcObject = stream;
    vChat.hVidL.play();
    vChat.hNameA.disabled = false;
  })
  .catch(err => {
    console.error(err);
    alert("Please attach a webcam and allow access.");
  });
},

// (C) SWITCH TO HTML SECTION
switch : n => { for (let i in vChat.hSec) {
  if (i==n) { vChat.hSec[i].classList.remove("hide"); }
  else { vChat.hSec[i].classList.add("hide"); }
}},

window.onload = vChat.init;vChat.init()Runs on page load. Get all the related HTML elements, and get permission to access the webcam – Which is necessary for the video call.vChat.switch()Switch between the “3 HTML steps”.
3C) VIDEO CALL FUNCTIONS
// (D) CONNECT TO PEERJS SERVER
open : () => {
  // (D1) NEW PEER OBJECT
  vChat.peerObj = new Peer(vChat.hNameA.value, vChat.peerOpt);

  // (D2) ON OPEN
  vChat.peerObj.on("open", id => {
    document.getElementById("nameAA").innerHTML = vChat.peerObj.id;
    vChat.switch(1);
  });

  // (D3) AUTO ANSWER CALLS
  vChat.peerObj.on("call", call => {
    vChat.peerCall = call;
    vChat.setcall();
    vChat.peerCall.answer(vChat.vStream);
  });

  // (D4) ON ERRORS
  vChat.peerObj.on("error", err => {
    console.error(err);
    alert(err.type);
  });
  return false;
},

// (E) CALL USER
call : () => {
  vChat.peerCall = vChat.peerObj.call(
    vChat.hNameB.value, vChat.vStream
  );
  vChat.setcall();
  return false;
},

// (F) SETUP CALLS
setcall : () => {
  vChat.peerCall.on("stream", stream => {
    vChat.hVidR.srcObject = stream;
    vChat.hVidR.play();
    vChat.switch(2);
  });
  vChat.peerCall.on("data", stream => vChat.hVidR.srcObject = stream);
  vChat.peerCall.on("error", err => console.error(err));
  vChat.peerCall.on("close", vChat.endcall);
},

// (G) END CALL
endcall : () => { try {
  vChat.switch(1);
  vChat.peerCall.close();
} catch (err) { console.error(err); }}
Not going to explain these line-by-line… A quick summary instead:
vChat.open()Step 1 of the wizard, connects and registers the user name with the Peer Server. Take note – The script is set to auto-answer any calls, feel free to change it.vChat.call()Step 2 of the wizard, make a video call to another user.vChat.setCall()Step 3 of the wizard, sort of a “helper function” for bothvChat.open()andvChat.call()to set up the video call.vChat.endCall()End the call and close the connection.
EXTRAS
That’s all for the tutorial, and here is a small section on some extras and links that may be useful to you.
I DENIED WEBCAM ACCESS

Once denied, navigator.mediaDevices.getUserMedia() will no longer show the prompt. The only way to “fix” it is to open the information panel beside the URL, and manually enable access to the camera and microphone.
COMPATIBILITY CHECKS
- Arrow Functions – CanIUse
- Web RTC – CanIUse
- Stream API – CanIUse
This example should work on all modern “Grade A” browsers.
LINKS & REFERENCES
- PeerJS – Official Website
- PeerJS – GitHub
- PeerJS Server – GitHub
- Express – NodeJS Web Server
THE END
Thank you for reading, and we have come to the end. I hope that it has helped you to better understand, and if you want to share anything with this guide, please feel free to comment below. Good luck and happy coding!