Welcome to a tutorial on how to disable HTML elements. Things get complicated when it comes to disabling HTML elements. It can mean disabling a form, stopping videos, preventing copy-paste, preventing text highlighting, or removing clicks.
- There is no such thing as a “universal way to disable all HTML elements”.
- However, there are various techniques to prevent/disable certain sections.
Let us walk through some examples in this guide, read on!
TABLE OF CONTENTS
DOWNLOAD & NOTES
Here is the download link to the example code, so you don’t have to copy-paste everything.
EXAMPLE CODE DOWNLOAD
Click here to download | Example on CodePen
Just click on “download zip” or do a git clone. I have released it under the MIT license, so feel free to build on top of it or use it in your own project.
SORRY FOR THE ADS...
But someone has to pay the bills, and sponsors are paying for it. I insist on not turning Code Boxx into a "paid scripts" business, and I don't "block people with Adblock". Every little bit of support helps.
Buy Me A Coffee Code Boxx eBooks
DISABLE HTML ELEMENTS
All right, let us now get into the various ways to disable elements/sections in HTML.
TUTORIAL VIDEO
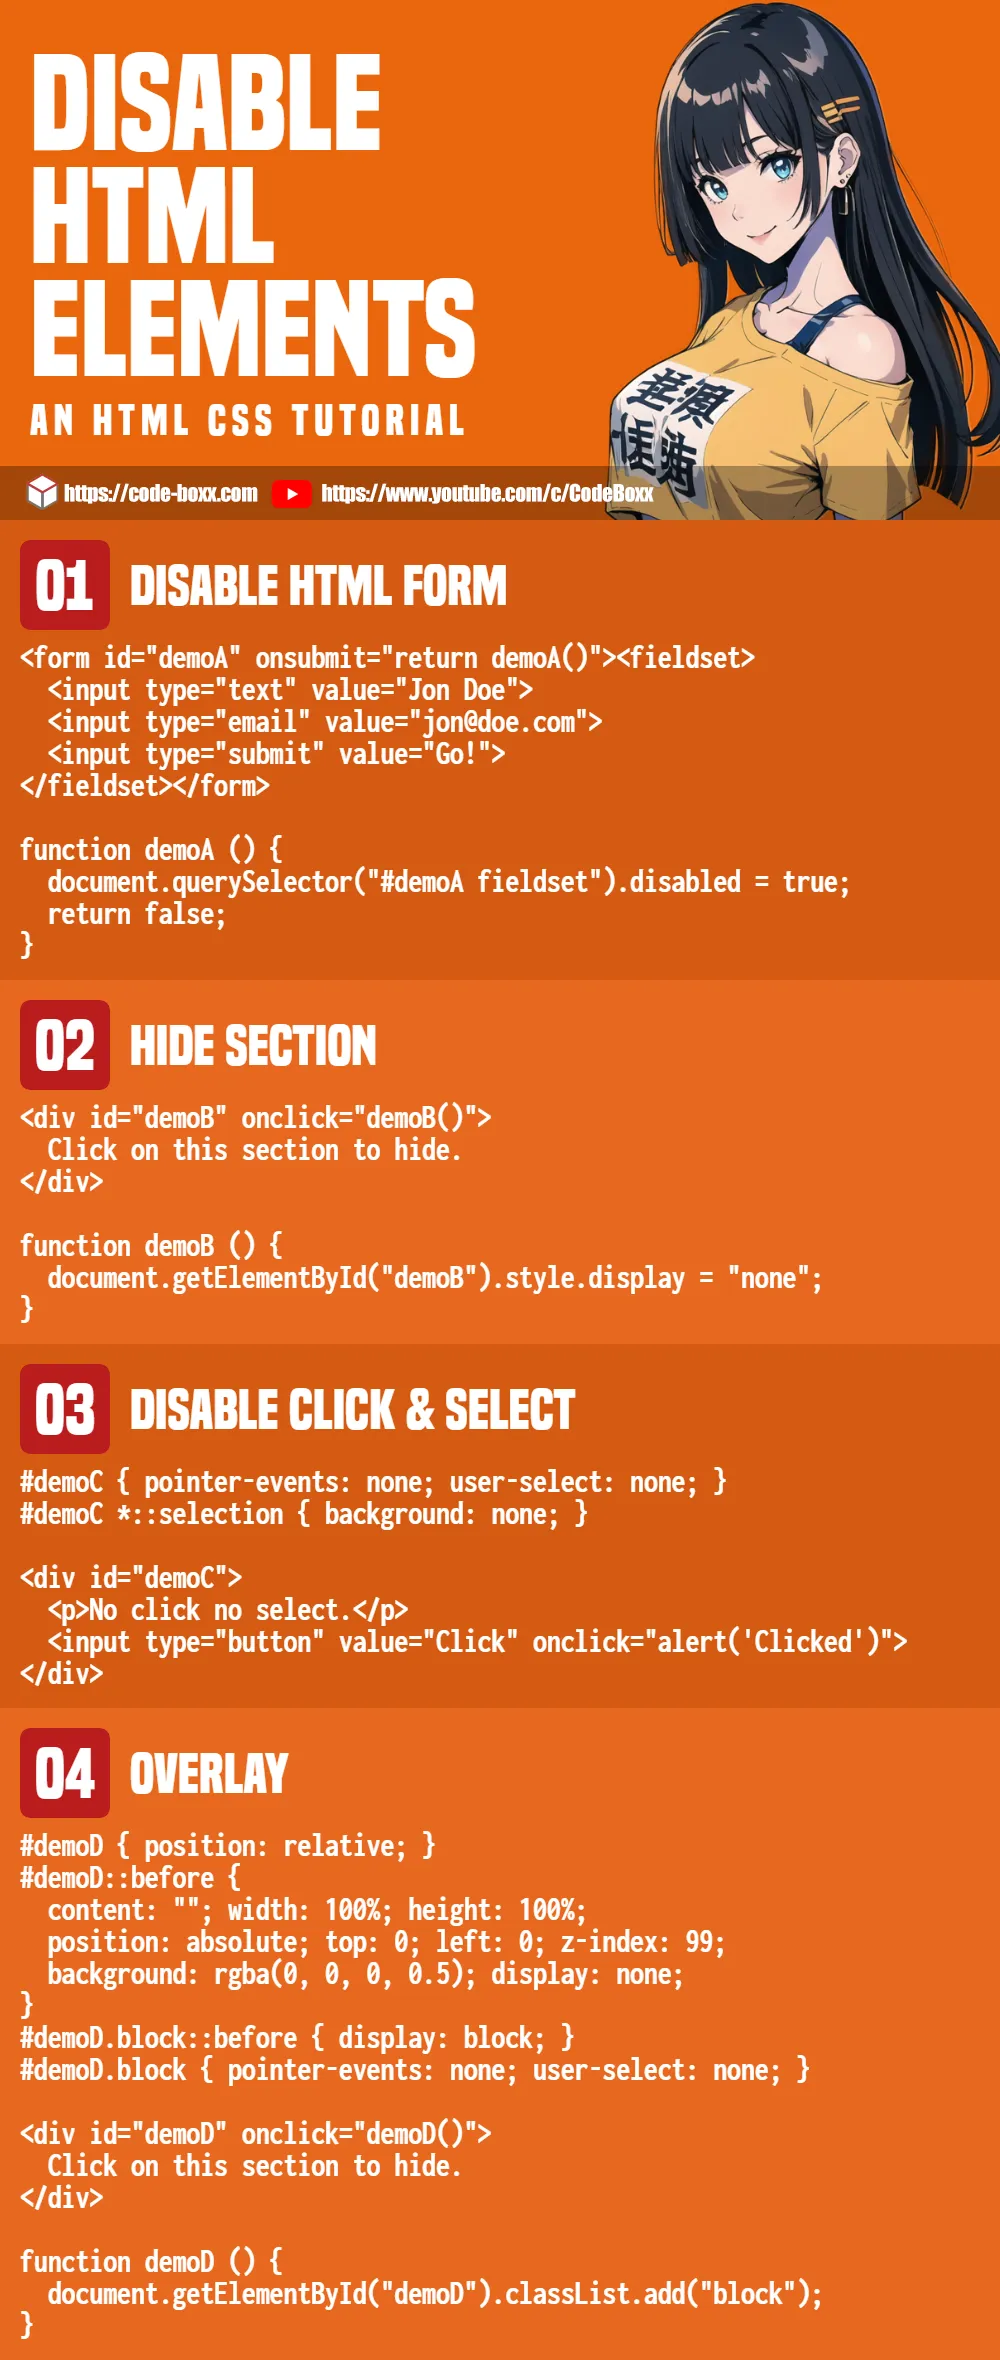
METHOD 1) DISABLE HTML FORM
<!-- (A) HTML FORM -->
<form id="demoA" onsubmit="return demoA()">
<fieldset>
  <input type="text" value="Jon Doe">
  <input type="email" value="jon@doe.com">
  <textarea>I am not John Wick.</textarea>
  <input type="radio" value="Cate">
  <input type="checkbox" value="Doge">
  <input type="submit" value="Go!">
</fieldset>
</form>

<!-- (B) DISABLE FORM -->
<script>
function demoA () {
  document.querySelector("#demoA fieldset").disabled = true;
  // document.querySelector("#demoA fieldset").disabled = false;
  return false;
}
</script>If you want to disable an HTML form:
- The weird part is that disabling the entire form will not work –
<form disabled>. - But we can disable a section of the form –
<fieldset disabled>. - So wrap your
<form>with another layer of<fieldset>, disable the section instead.
METHOD 2) HIDE SECTION
<!-- (A) DIV TO "DISABLE" -->
<div id="demoB" onclick="demoB()">
  <h1>HELLO WORLD!</h1>
  <p>Click on this section to hide.</p>
</div>

<!-- (B) HIDE SECTION -->
<script>
function demoB () {
  document.getElementById("demoB").style.display = "none";
  // document.getElementById("demoB").style.display = "block";
}
</script>Click on this section to hide.
This is not really “disable”, but it hides the entire section – A common technique to lessen the confusion, display the section only when necessary.
METHOD 3) DISABLE POINTER & SELECT
<!-- (A) DISABLE CLICKS & SELECT -->
<style>
#demoC {
  pointer-events: none;
  user-select: none;
}
#demoC *::selection { background: none; }
</style>

<!-- (B) CONTAINER -->
<div id="demoC">
  <p>No click no select.</p>
  <input type="button" value="Click" onclick="alert('Clicked')">
</div>The magic of modern CSS.
pointer-events: noneDisable clicks.user-select: noneDisable select/highlight.
METHOD 4) OVERLAY COVER
<!-- (A) CREATE AN OVERLAY -->
<style>
/* (A1) SET RELATIVE POSITION ON CONTAINER */
#demoD { position: relative; }

/* (A2) OVERLAY */
#demoD::before {
  content: ""; width: 100%; height: 100%;
  position: absolute; top: 0; left: 0; z-index: 99;
  background: rgba(0, 0, 0, 0.5);
  backdrop-filter: blur(3px);
  display: none;
}

/* (A3) "ACTIVATE OVERLAY" */
#demoD.block::before { display: block; }
#demoD.block {
  pointer-events: none;
  user-select: none;
}
</style>

<!-- (B) DIV TO "DISABLE" -->
<div id="demoD" onclick="demoD()">
  <h1>HELLO WORLD!</h1>
  <p>Click on this section to hide.</p>
</div>

<!-- (C) COVER SECTION -->
<script>
function demoD () {
  document.getElementById("demoD").classList.add("block");
  // document.getElementById("demoD").classList.remove("block");
}
</script>Click on this section to hide.
This is seemingly confusing, but keep calm and study closely. This is pretty much a combination of the above 2 methods.
- (B) The section itself.
- (A1 & A2) Create an overlay for the section using the
::beforepseudo-class. - (A3) The overlay is hidden by default, but it will show when a
.blockCSS class is attached to the section. - (C) Add the
.blockCSS class when the user clicks on the section. This will show the section overlay and disable click/select.
EXTRAS
That’s all for this guide, and here is a small section on some extras and links that may be useful to you.
MORE WAYS TO “DISABLE ELEMENTS”
Before the trolls start to rage, the above examples only covered some of the “common disabling techniques”. There are endless ways to “disable HTML elements”, it depends on what you are trying to do.
- To “disable” video and audio –
document.getElementById("MY-MEDIA").pause() - To stop all video and audio on the page –
for (let e of document.querySelectorAll("video audio")) { e.pause(); } - Remove an entire section instead of hiding it –
document.getElementById("MY-SECTION").remove() - Forward to another page entirely –
window.location.replace("https://code-boxx.com").
For more “disabling methods”, check out the links below.
INFOGRAPHIC CHEAT SHEET
LINKS & REFERENCES
- Fullscreen Overlay – Code Boxx
- Fullscreen Loading Spinner – Code Boxx
- Show & Hide Elements With Animation – Code Boxx
THE END
Thank you for reading, and we have come to the end of this guide. I hope that it has helped you with your project, and if you want to share anything with this guide, please feel free to comment below. Good luck and happy coding!