Welcome to a tutorial on how to compress images in PHP. So you need to do some image compression to save some disk space? Probably to speed up the loading as well?
An easy way to compress images in PHP is to use the GD library:
- Create an image object from the original image –
$img = imagecreatefromjpeg("ORIGINAL.JPG"); - Compress the image by either changing the file format and/or reducing the quality.
imagejpeg($img, "COMPRESSED.JPG", 50);imagewebp($img, "COMPRESSED.WEBP", 50);
That covers the quick-and-dirty solution for people who are working with JPG files. But how about the other formats? What if we need to resize the image as well? Read on for a simple image compress library that I have created – Read on!
TABLE OF CONTENTS
DOWNLOAD & NOTES
Here is the download link to the example code, so you don’t have to copy-paste everything.
EXAMPLE CODE DOWNLOAD
Just click on “download zip” or do a git clone. I have released it under the MIT license, so feel free to build on top of it or use it in your own project.
SORRY FOR THE ADS...
But someone has to pay the bills, and sponsors are paying for it. I insist on not turning Code Boxx into a "paid scripts" business, and I don't "block people with Adblock". Every little bit of support helps.
Buy Me A Coffee Code Boxx eBooks
PHP COMPRESS IMAGE
All right, let us now get into the examples of how to compress images in PHP – Using the GD extension.
PART 1) SIMPLE IMAGE COMPRESSION
// (A) IMAGE OBJECT
$img = imagecreatefrompng("demo.png");
imagepalettetotruecolor($img);
// (B) COMPRESS IMAGE
// (B1) BY REDUCING QUALITY
imagejpeg($img, "demoA.jpg", 50);
// (B2) BY CHANGING IMAGE FILE TYPE & REDUCING QUALITY
imagewebp($img, "demoA.webp", 50);
echo "DONE";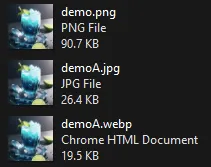 For you guys who are new, I will keep things as simple as possible. There are 2 “basic types” of images:
- Lossless – Doesn’t suffer quality loss when compressed, but usually large in file size. E.G. BMP, TIFF, RAW.
- Lossy – Suffers quality loss when compressed (blurry image), but usually small in file size. E.G. JPG, WEBP.
So when it comes to “image compression”, we are usually referring to lossy images. The lower the image quality, the smaller the file size; The higher the quality, the larger the file size. It is pretty much a game of balancing how much to bring the quality down VS the file size. To “compress” an image in the simplest form, we just have to take the quality down.
imagecreatefromjpeg(IMAGE FILE)Creates an image object from the given file. Take note, there are respective functions to open different image types –imagecreatefrompng() imagecreatefromwebp imagecreatefrombmp().imagejpeg(IMAGE OBJECT, FILE, QUALITY)Save to specified file,QUALITYis a number from 0 (lowest) to 100 (highest). Similarly,imagewebp(IMAGE OBJECT, FILE, QUALITY).
PART 2) RESIZING IMAGES
<?php
// (A) IMAGE OBJECT
$img = imagecreatefrompng("demo.png");
imagepalettetotruecolor($img);
// (B) RESIZE IMAGE
$img = imagescale($img, 200, 200);
// (C) COMPRESS IMAGE
imagewebp($img, "demoB.webp", 50);
echo "DONE";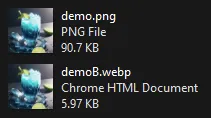 To further bring the file size down, we can permanently resize the image. GD2 provides a very simple function to do that –
 imagescale(IMAGE OBJECT, WIDTH, HEIGHT). Yep, that’s all.
P.S. Do this at your own discretion… Once resized, there will be a quality loss.
PART 3) IMAGE COMPRESS FUNCTION – RESIZE & COMPRESS
function packi ($from, $to, $mw=null, $mh=null, $quality=null) {
// (A) CHECKS
// (A1) SOURCE IMAGE IS READABLE
if (!is_readable($from)) { exit("Cannot read $from"); }
// (A2) ALLOWED IMAGE FILE FORMATS
$extFrom = strtolower(pathinfo($from, PATHINFO_EXTENSION));
$extTo = strtolower(pathinfo($to, PATHINFO_EXTENSION));
if (!in_array($extFrom, ["jpeg", "jpg", "gif", "png", "bmp", "webp"])) { exit("$from - Invalid file format"); }
if (!in_array($extTo, ["jpeg", "jpg", "gif", "png", "webp"])) { exit("$from - Invalid file format"); }
// (B) OPEN SOURCE IMAGE
$fn = "imagecreatefrom" . ($extFrom=="jpg" ? "jpeg" : $extFrom);
$img = $fn($from);
// (C) RESIZE IMAGE
if ($mw!=null || $mh!=null) {
// (C1) SOURCE IMAGE DIMENSIONS
$sw = imagesx($img);
$sh = imagesy($img);
// (C2) RESIZE RATIO
if ($mw != null && $sw>$mw) { $rw = $mw / $sw; } else { $rw = 1; }
if ($mh != null && $sh>$mh) { $rh = $mh / $sh; } else { $rh = 1; }
// (C3) RESIZE USING THE SMALLER RATIO
if ($rw!=1 || $rh!=1) {
$rr = $rw<$rh ? $rw : $rh ;
$img = imagescale($img, floor($rr * $sw), floor($rr * $sh));
}
}
// (D) SAVE & COMPRESS IMAGE
// jpg : 0 to 100
// webp : -1 (default), 0 to 100
// png : -1 (default), 0 (none) to 9
// gif : na (no compression)
if ($extTo=="gif") { imagegif($img, $to); }
else {
if ($extTo=="jpg" && ($quality==null || !is_numeric($quality) || $quality<0 || $quality>100)) { $quality = 30; }
if ($extTo=="webp" && ($quality==null || !is_numeric($quality) || $quality<-1 || $quality>100)) { $quality = -1; }
if ($extTo=="png" && ($quality==null || !is_numeric($quality) || $quality<-1 || $quality>9)) { $quality = -1; }
$fn = "image" . ($extTo=="jpg" ? "jpeg" : $extTo);
$fn($img, $to, $quality);
}
return true;
}
// (E) GO!
packi("D:/http/demo.png", "D:/http/demoC.jpg");
packi("D:/http/demo.png", "D:/http/demoC.png", 200, 0); // max width 200
packi("D:/http/demo.png", "D:/http/demoC.gif", 0, 200); // max height 200
packi("D:/http/demo.png", "D:/http/demoC.webp", 200, 400); // max width 200, max height 400
echo "DONE";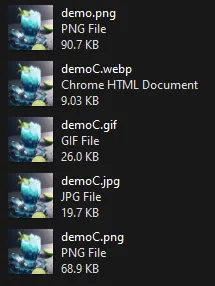 For you guys who just want “a function to compress images”, I got you covered. Just use
 packi(SOURCE IMAGE, SAVE TO, MAX WIDTH, MAX HEIGHT, QUALITY).
SOURCE IMAGEThe original image.SAVE TOSave to this file, can bejpg webp png gif.MAX WIDTH & MAX HEIGHTOptional, will resize the original image if it exceeds these settings.QUALITYSave quality, optional.JPGFrom 0 (lowest) to 100 (highest).WEBPFrom 0 (lowest) to 100 (highest), -1 for default.PNGFrom 0 (no compression) to 9, -1 for default.GIFNone. Cannot be compressed.
EXTRAS
That’s all for this guide, and here is a small section on some extras and links that may be useful to you.
THE TRANSPARENT BACKGROUND DISAPPEARED!?
For the uninitiated – Only WEBP, PNG, and GIF supports a transparent background.
COMPRESSION MAY NOT ALWAYS END WELL
Take note of the screenshot in the last example, the PNG file actually ends up larger than the original. So to manage your expectation, changing the image dimensions/type/compression may not always end up with good results. But if it works 90% of the time, then it’s worth the effort to implement the compression.
LAZY LOADING
Lastly, a small extra for you guys who wants to “speed up loading”. Just set the images to lazy loading. That is, the images will only load as the user scrolls down, when the image is on the screen. Very easy, just add lazy to the image tag – <img lazy src="IMAGE">.
LINKS & REFERENCES
- Lossy vs Lossless Compression – Kinsta
- Lazy Loading – MDN
- How To Resize Images In PHP – Code Boxx
- How to Add Text to Images In PHP – Code Boxx
- Simple Drag-and-drop File Upload With PHP – Code Boxx
- GD Manual – PHP
THE END
Thank you for reading, and we have come to the end of this guide. I hope that it has helped you with your project, and if you want to share anything with this guide, please feel free to comment below. Good luck and happy coding!