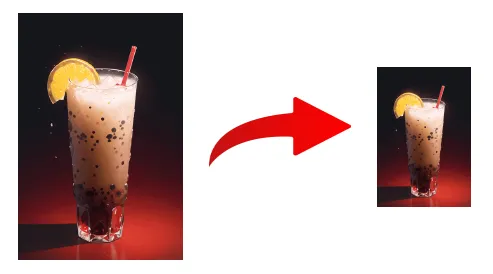
Welcome to a tutorial on how to resize images in PHP. So you have a project that deals with images, and want to resize them due to space restrictions… or maybe you just want to create thumbnails of the uploaded images.
An easy way to resize images in PHP is to use the GD library:
$original = imagecreatefromjpeg("ORIGINAL.jpg");$resized = imagescale($original, NEW WIDTH, NEW HEIGHT);imagejpeg($resized, "RESIZED.jpg");
That covers the basics, but let us walk through with a few detailed examples – Read on!
TABLE OF CONTENTS
DOWNLOAD & NOTES
Here is the download link to the example code, so you don’t have to copy-paste everything.
EXAMPLE CODE DOWNLOAD
Just click on “download zip” or do a git clone. I have released it under the MIT license, so feel free to build on top of it or use it in your own project.
SORRY FOR THE ADS...
But someone has to pay the bills, and sponsors are paying for it. I insist on not turning Code Boxx into a "paid scripts" business, and I don't "block people with Adblock". Every little bit of support helps.
Buy Me A Coffee Code Boxx eBooks
PHP IMAGE RESIZE
All right, let us now get into the examples of how to resize images in PHP.
TUTORIAL VIDEO
1) SIMPLE IMAGE RESIZE
<?php
// (A) READ THE ORIGINAL IMAGE
$original = imagecreatefrompng("resize.png"); // original 400 x 600 px

// (B) RESIZE IMAGE
// IMG_NEAREST_NEIGHBOUR, IMG_BILINEAR_FIXED, IMG_BICUBIC, IMG_BICUBIC_FIXED
$resized = imagescale($original, 200, 300, IMG_BICUBIC); // 50% smaller

// (C) SAVE RESIZED IMAGE
imagewebp($resized, "demoA.webp", 70);

// (D) OPTIONAL - CLEAN UP
imagedestroy($original);
imagedestroy($resized);
As in the introduction snippet, the process is as easy as opening, resizing, and saving. But to add on:
- Take note that we use different
imagecreatefromABCfunctions to open different image formats. imagescaletakes in 4 parameters.- The first is the original image.
- Followed by the width and height.
- Lastly, an optional resize mode.
IMG_BICUBICwill produce “smoother edges”, andIMG_NEAREST_NEIGHBOURgives “sharp edges”.
- Finally, we also use the respective
imageXYZfunctions to save to different image formats. - Optional, clean up the image objects from the memory.
2) RESIZE IMAGE FUNCTION
<?php
function resizer ($source, $destination, $size, $quality=null) {
// $source - Original image file
// $destination - Resized image file name
// $size - Single number for percentage resize
// Array of 2 numbers for fixed width + height
// $quality - Optional image quality. JPG & WEBP = 0 to 100, PNG = -1 to 9

  // (A) CHECKS
  if (!file_exists($source)) { throw new Exception("Source image file not found"); }
  $sExt = strtolower(pathinfo($source)["extension"]);
  $dExt = strtolower(pathinfo($destination)["extension"]);
  $allowed = ["bmp", "gif", "jpg", "jpeg", "png", "webp"];
  if (!in_array($sExt, $allowed)) { throw new Exception("$sExt - Invalid image file type"); }
  if (!in_array($dExt, $allowed)) { throw new Exception("$dExt - Invalid image file type"); }
  if ($quality != null) {
    if (in_array($dExt, ["jpg", "jpeg", "webp"]) && ($quality<0 || $quality>100)) { $quality = 70; }
    if ($dExt == "png" && ($quality<-1 || $quality>9)) { $quality = -1; }
    if (!in_array($dExt, ["png", "jpg", "jpeg", "webp"])) { $quality = null; }
  }

  // (B) NEW IMAGE DIMENSIONS
  if (is_array($size)) {
    $new_width = $size[0];
    $new_height = $size[1];
  } else {
    $dimensions = getimagesize($source);
    $new_width = ceil(($size/100) * $dimensions[0]);
    $new_height = ceil(($size/100) * $dimensions[1]);
  }

  // (C) RESIZE
  $fnCreate = "imagecreatefrom" . ($sExt=="jpg" ? "jpeg" : $sExt);
  $original = $fnCreate($source);
  $resized = imagescale($original, $new_width, $new_height, IMG_BICUBIC);

  // (D) OUTPUT & CLEAN UP
  $fnOutput = "image" . ($dExt=="jpg" ? "jpeg" : $dExt);
  if (is_numeric($quality)) {
    $fnOutput($resized, $destination, $quality);
  } else {
    $fnOutput($resized, $destination);
  }
  imagedestroy($original);
  imagedestroy($resized);
}

// (E) EXAMPLE USAGE
// (E1) PERCENTAGE RESIZE
resizer("resize.png", "demoB.jpg", 50);
resizer("resize.png", "demoC.png", 25);

// (E2) FIXED DIMENSION RESIZE + QUALITY
resizer("resize.png", "demoD.png", [100, 150], -1);
resizer("resize.png", "demoE.webp", [200, 300], 60);
It is a real hassle to manually change imagecreatefromABC and imageXYZ, so I have packaged a function to help you guys.
- To resize by percentage –
resizer(ORIGINAL, DESTINATION, PERCENTAGE) - To resize to an exact dimension –
resizer(ORIGINAL, DESTINATION, [WIDTH, HEIGHT]) - Lastly, you can also specify the image quality.
- For
JPG, JPEG, WEBP–resizer(ORIGINAL, DESTINATION, DIMENSION, 0 TO 100) - For
PNG–resizer(ORIGINAL, DESTINATION, DIMENSION, -1 TO 9)
- For
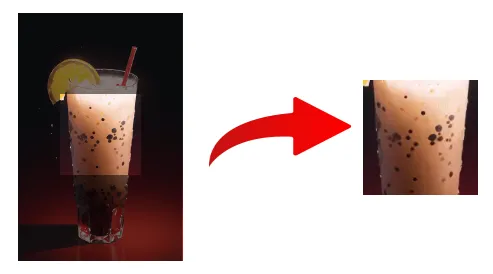
3) EXTRACT PART OF IMAGE & RESIZE
<?php
// (A) READ THE ORIGINAL IMAGE
$original = imagecreatefrompng("resize.png");

// (B) EMPTY CANVAS WITH REQUIRED DIMENSIONS
$resized = imagecreatetruecolor(150, 150);

// (C) EXTRACT PART OF ORIGINAL IMAGE ONTO EMPTY CANVAS
imagecopyresampled(
  $resized, $original, // to resized, from original
  0, 0, 100, 200, // dest-x, dest-y, src-x, src-y
  150, 150, 200, 200 // dest-w, dest-h, src-w, src-h
);

// (E) SAVE/OUTPUT RESIZED IMAGE
imagewebp($resized, "demoF.webp", 70);

// (F) OPTIONAL - CLEAN UP
imagedestroy($original);
imagedestroy($resized);
Finally, we can also extract and resize a part of the image. Slightly more roundabout:
imagecreatefrompng()– Load the source image as usual.imagecreatetruecolor()– Create an empty canvas.imagecopyresampled()– “Copy” part of the source image onto the empty canvas.imagewebp()– Save it.
EXTRAS
We are now done with the scripts, here are some small extras and links that may be useful to you.
SUMMARY OF FUNCTIONS
| Function | Description | PHP Manual |
imagecreatefromjpeg(FILE) |
The whole family of imagecreatefromABC() functions are used to create an image object from the specified file. |
Click Here |
imagescale(SOURCE, WIDTH, HEIGHT, MODE) |
Resize the image. | Click Here |
imagecreatetruecolor(WIDTH, HEIGHT) |
Create an empty canvas with the specified width and height. | Click Here |
imagecopyresampled(DESTINATION, SOURCE, DX, DY, SX, SY) |
Copy part of the source image and resize. | Click Here |
imagejpeg(IMAGE, FILE NAME) |
The whole family of imageXYZ() is used to save and output an image object. |
Click Here |
imagedestroy(IMAGE) |
Destroy an image. | Click Here |
LINKS & REFERENCES
- How do I resize pngs with transparency in PHP? – StackOverflow
- PHP Image Resize – PHPPot
THE END
Thank you for reading, and we have come to the end of this short guide. I hope it has solved your image resize problems, and if you have anything to add to this guide, please feel free to comment below. Good luck and happy coding!

Thanks for this. One thing to note is the output ignores orientation in the exif data of the source image. The code below will fix that.
Hello W.S. TOH,
Thank you very much for the tutorial, I was looking for something like this and your code explained very well and cleanly how to make php image functions properly work. It sparked my mind hehe. Thanks again!