Welcome to a tutorial on how to create a simple admin panel with NodeJS and Express. So you need to create an admin panel for your project, but don’t want to go through all the “crazy stuff”? Here’s a simple version of mine that you can build on – Read on!
TABLE OF CONTENTS
DOWNLOAD & NOTES
Here is the download link to the example code, so you don’t have to copy-paste everything.
EXAMPLE CODE DOWNLOAD
Just click on “download zip” or do a git clone. I have released it under the MIT license, so feel free to build on top of it or use it in your own project.
SORRY FOR THE ADS...
But someone has to pay the bills, and sponsors are paying for it. I insist on not turning Code Boxx into a "paid scripts" business, and I don't "block people with Adblock". Every little bit of support helps.
Buy Me A Coffee Code Boxx eBooks
NODEJS EXPRESS ADMIN PANEL
All right, let us now get into the details of building a simple admin panel with NodeJS and Express.
QUICK SETUP
- Run
npm i bcryptjs express ejs body-parser cookie-parser multer jsonwebtokento install the required modules. - There are 2 folders in this project:
assetsCSS, Javascript, images.viewsHTML templates.
PART 1) HTML TEMPLATE
1A) TOP & BOTTOM HALVES
<!DOCTYPE html>
<html>
<head>
<title>TEST</title>
<meta charset="utf-8">
<meta name="robots" content="noindex">
<meta name="viewport" content="width=device-width, initial-scale=1.0, maximum-scale=1.5">
<link rel="stylesheet" href="assets/1-admin.css">
<script src="assets/1-admin.js"></script>
</head>
<body>
<!-- (A) SIDEBAR -->
<div id="pgside">
<!-- (A1) BRANDING OR USER -->
<div id="pguser" onclick="if(confirm('Sign Off?')){logout();}">
<input type="hidden" name="logout" value="1">
<img src="assets/pic.png" id="pguserimg">
<div class="txt">
<div id="pgusername"><%= user %></div>
<div id="pguseracct">account | logoff</div>
</div>
</div>
<!-- (A2) MENU ITEMS -->
<a href="#" class="current">
<i class="ico">★</i>
<i class="txt">Section A</i>
</a>
<a href="#">
<i class="ico">☀</i>
<i class="txt">Section B</i>
</a>
<a href="#">
<i class="ico">☉</i>
<i class="txt">Section C</i>
</a>
</div>
<!-- (B) MAIN -->
<main id="pgmain"> </main>
</body>
</html>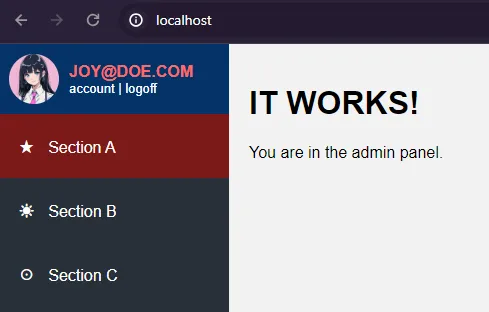
First, let us start with the HTML template for the admin panel. It may look pretty complicated for some beginners, but keep calm and study closely – This is but a simple 2 columns layout.
<div id="pgside">The sidebar menu.<main id="pgmain">Main content area.
P.S. We are using EJS to handle HTML templates here. Links in the extras section below if you want to study more.
1B) JAVASCRIPT
function logout () {
  fetch("/out", { method:"POST" })
  .then(res => res.text())
  .then(txt => {
    if (txt=="OK") { location.href = "/"; }
    else { alert(txt); }
  })
  .catch(err => console.error(err));
}
Next, we have a tiny bit of Javascript to handle user logout – Do a simple POST call to /out. We will be using JSON Web Token (JWT) to handle the user session, more on that below.
1C) DUMMY HOME PAGE
<%- include("1-top.ejs"); %>
<h1>IT WORKS!</h1>
<p>You are in the admin panel.</p>
<%- include("1-bottom.ejs"); %>
Lastly, here’s how to create a page with the template. Just sandwich your content between the “top and bottom pieces”.
PART 2) LOGIN PAGE
2A) THE HTML
<form method="post" id="login" onsubmit="return login()">
  <h1>ADMIN LOGIN</h1>
  <label>Email</label>
  <input type="email" name="email" required value="joy@doe.com">
  <label>Password</label>
  <input type="password" name="password" required value="12345">
  <input type="submit" value="Login">
</form>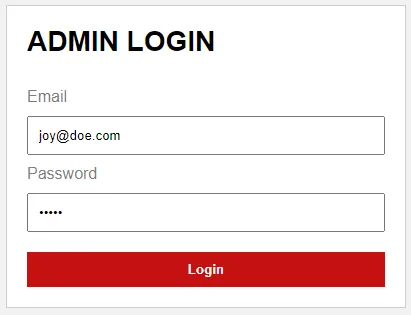
With the template out of the way, let us create another login page. Don’t think this needs a lot of explanation. Just a “regular” login form with email and password.
2B) LOGIN JAVASCRIPT
function login () {
  // (A) GET EMAIL + PASSWORD
  var data = new FormData(document.getElementById("login"));

  // (B) AJAX REQUEST
  fetch("/in", { method:"POST", body:data })
  .then(res => res.text())
  .then(txt => {
    if (txt=="OK") { location.href = "/"; }
    else { alert(txt); }
  })
  .catch(err => console.error(err));
  return false;
}
To process the login, we will send the email and password to a /in endpoint.
P.S. Remember to remove the email and password values in your own project.
PART 3) EXPRESS SERVER
3A) INITIALIZE
// (A) INITIALIZE
// (A1) LOAD REQUIRED MODULES
// npm i bcryptjs express ejs body-parser cookie-parser multer jsonwebtoken
const bcrypt = require("bcryptjs"),
      path = require("path"),
      express = require("express"),
      bodyParser = require("body-parser"),
      cookieParser = require("cookie-parser"),
      multer = require("multer"),
      jwt = require("jsonwebtoken");

// (A2) INIT EXPRESS SERVER
const app = express();
app.set("view engine", "ejs");
app.use(multer().array());
app.use(bodyParser.urlencoded({ extended: false }));
app.use(cookieParser());
So far so good? That’s all for the HTML, and here’s the Express server script. The first section is self-explanatory, we load the required modules and initialize the Express server.
3B) USER ACCOUNTS
// (B) USER ACCOUNTS - AT LEAST ENCRYPT YOUR PASSWORDS!
// bcrypt.hash("PASSWORD", 8, (err, hash) => { console.log(hash); });
const users = {
  "joy@doe.com" : "$2a$08$g0ZKZhiA97.pyda3bsdQx.cES.TLQxxKmbvnFShkhpFeLJTc6DuA6"
};
The lazy way to store users without a database… Yep, I am just keeping things simple here. It’s best to implement a database in your own project for an added layer of security.
3C) JWT SESSION
// (C) JSON WEB TOKEN
// (C1) SETTINGS - CHANGE TO YOUR OWN!
const jwtKey = "YOUR-SECRET-KEY",
      jwtIss = "YOUR-NAME",
      jwtAud = "site.com",
      jwtAlgo = "HS512";

// (C2) GENERATE JWT TOKEN
jwtSign = email => {
  // (C2-1) RANDOM TOKEN ID
  let char = "ABCDEFGHIJKLMNOPQRSTUVWXYZabcdefghijklmnopqrstuvwxyz0123456789~!@#$%^&_-", rnd = "";
  for (let i=0; i<16; i++) {
    rnd += char.charAt(Math.floor(Math.random() * char.length));
  }

  // (C2-2) UNIX TIMESTAMP NOW
  let now = Math.floor(Date.now() / 1000);

  // (C2-3) SIGN TOKEN
  return jwt.sign({
    iat : now, // issued at - time when token is generated
    nbf : now, // not before - when this token is considered valid
    exp : now + 3600, // expiry - 1 hr (3600 secs) from now in this example
    jti : rnd, // random token id
    iss : jwtIss, // issuer
    aud : jwtAud, // audience
    data : { email : email } // whatever else you want to put
  }, jwtKey, { algorithm: jwtAlgo });
};

// (C3) VERIFY TOKEN
jwtVerify = (cookies) => {
  if (cookies.JWT===undefined) { return false; }
  try {
    let decoded = jwt.verify(cookies.JWT, jwtKey);
    // DO WHATEVER EXTRA CHECKS YOU WANT WITH DECODED TOKEN
    // console.log(decoded);
    return decoded["data"];
  } catch (err) { return false; }
};
As mentioned earlier, we are using JWT to handle user sessions. For those who are new, JWT is just an encoded cookie.
- (C1) Change the settings to your own.
- Generate or enter your secret key.
- Change the issuer to your site or company name.
- Change the audience to your site URL.
- (C2) On successful user login,
jwtSign()will create an encodedJWTcookie. - (C3) On subsequent visits, we use
jwtVerify()to decode and verify theJWTcookie.
3D) HTML PAGES & ENDPOINTS
// (D) EXPRESS HTTP
// (D1) STATIC ASSETS
app.use("/assets", express.static(path.join(__dirname, "assets")))

// (D2) DUMMY ADMIN HOME PAGE - REGISTERED USERS ONLY
app.get("/", (req, res) => {
  let user = jwtVerify(req.cookies);
  if (user === false) {
    res.redirect("../login");
  } else {
    res.render("1-admin.ejs", { user : user["email"] });
  }
});

// (D3) LOGIN PAGE
app.get("/login", (req, res) => {
  if (jwtVerify(req.cookies) === false) {
    res.render("2-login.ejs");
  } else {
    res.redirect("../");
  }
});

// (D4) LOGIN ENDPOINT
app.post("/in", async (req, res) => {
  let pass = users[req.body.email] !== undefined;
  if (pass) {
    pass = await bcrypt.compare(req.body.password, users[req.body.email]);
  }
  if (pass) {
    res.cookie("JWT", jwtSign(req.body.email));
    res.status(200);
    res.send("OK");
  } else {
    res.status(200);
    res.send("Invalid user/password");
  }
});

// (D5) LOGOUT ENDPOINT
app.post("/out", (req, res) => {
  res.clearCookie("JWT");
  res.status(200);
  res.send("OK");
});
The HTML pages and endpoints.
/The dummy admin home page, requires a valid user login to access./loginThe login page./inSign-in process, send the email and password here. Sets aJWTcookie on validation./outThe sign-out process, simply removes theJWTcookie.
3E) START!
// (E) START EXPRESS SERVER
app.listen(80, () => console.log(`Server running at port 80`));
Lastly, I don’t think this needs any explanation.
EXTRAS
That’s all for the tutorial, and here is a small section on some extras and links that may be useful to you.
WHAT’S NEXT?
As you can see, this is pretty much a working skeleton template. Plenty to be done here:
- Complete your own template customizations – Menu items, use your own frameworks, define more “template areas”, etc…
- The login mechanism is kind of raw, implement your own database if you want.
- Add your own pages and “API endpoints”. Modify the server script and better manage these if you want.
- Add more “security stuff”.
- If you add more pages and endpoints, make sure only signed-in users with a valid
JWTcookie can access/process. - Implement CSRF if security is a concern.
- Keep track of user actions, and keep a log of the device/IP address. Hit the user with 2FA if the device/geo IP has changed.
- If you add more pages and endpoints, make sure only signed-in users with a valid
LINKS & REFERENCES
- ExpressJS
- EJS
- NodeJS Express JWT Login – Code Boxx
THE END
Thank you for reading, and we have come to the end. I hope that it has helped you to better understand, and if you want to share anything with this guide, please feel free to comment below. Good luck and happy coding!