Welcome to a tutorial on how to create a simple timetable with PHP and MySQL. Need to store a schedule in the database? Then retrieve and display it in a “nicely formatted” HTML table? Well, let us walk through a simple example. Read on!
TABLE OF CONTENTS
DOWNLOAD & NOTES
Here is the download link to the example code, so you don’t have to copy-paste everything.
EXAMPLE CODE DOWNLOAD
Just click on “download zip” or do a git clone. I have released it under the MIT license, so feel free to build on top of it or use it in your own project.
SORRY FOR THE ADS...
But someone has to pay the bills, and sponsors are paying for it. I insist on not turning Code Boxx into a "paid scripts" business, and I don't "block people with Adblock". Every little bit of support helps.
Buy Me A Coffee Code Boxx eBooks
PHP MYSQL TIMETABLE
All right, let us now get into more details on how the PHP MySQL timetable works.
PART 1) THE DATABASE
1A) DATABASE STRUCTURE
-- (A) EVENTS TABLE
CREATE TABLE `events` (
`event_id` bigint(20) NOT NULL,
`event_txt` varchar(255) NOT NULL,
`event_row` varchar(255) NOT NULL,
`event_col` varchar(255) NOT NULL
) ENGINE=InnoDB DEFAULT CHARSET=utf8mb4;
ALTER TABLE `events`
ADD PRIMARY KEY (`event_id`);
ALTER TABLE `events`
MODIFY `event_id` bigint(20) NOT NULL AUTO_INCREMENT, AUTO_INCREMENT=4;
-- (B) DUMMY DATA
INSERT INTO `events` (`event_id`, `event_txt`, `event_row`, `event_col`) VALUES
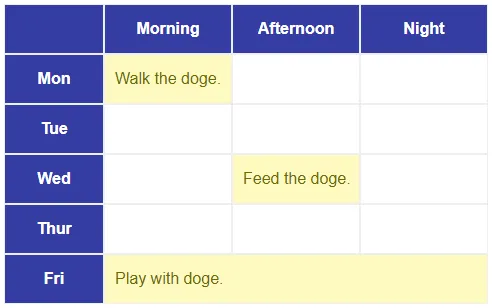
(1, 'Walk the doge.', '2', '2/3'),
(2, 'Feed the doge.', '4', '3/4'),
(3, 'Play with doge.', '6', '2');The database should be pretty self-explanatory.
event_idPrimary key and auto-increment.event_txtDetails on the event itself.event_row event_colTimetables can have various intervals – Weekly, daily, hourly, morning/afternoon/night, etc… So it makes sense to use a “generic” row/column here instead of a fixed date/time.
Feel free to add more fields as required – Text color, background color, user, name, etc…
1B) ROW & COLUMN EVENT INTERVALS
- For this example, the rows of the timetable cover Monday to Friday (see screenshot above).
- Row 1 is reserved for the header.
- So row 2 refers to Monday, row 3 refers to Tuesday, and so on.
- There are only 3 columns – morning, afternoon, and night.
- Again, column 1 is reserved for the header.
- So, column 2/3 refers to an event that spans the entire morning.
- Column 3/4 spans the entire afternoon, and 4/5 spans the entire night.
- Column 2 will assume that the event spans from morning to night.
PART 2) PHP LIBRARY
<?php
class TimeTable {
  // (A) CONSTRUCTOR - CONNECT TO DATABASE
  private $pdo = null;
  private $stmt = null;
  public $error = "";
  function __construct () {
    $this->pdo = new PDO(
      "mysql:host=".DB_HOST.";dbname=".DB_NAME.";charset=".DB_CHARSET,
      DB_USER, DB_PASSWORD, [
      PDO::ATTR_ERRMODE => PDO::ERRMODE_EXCEPTION,
      PDO::ATTR_DEFAULT_FETCH_MODE => PDO::FETCH_ASSOC
    ]);
  }

  // (B) DESTRUCTOR - CLOSE DATABASE CONNECTION
  function __destruct () {
    if ($this->stmt!==null) { $this->stmt = null; }
    if ($this->pdo!==null) { $this->pdo = null; }
  }

  // (C) HELPER FUNCTION - EXECUTE SQL QUERY
  function query ($sql, $data=null) : void {
    $this->stmt = $this->pdo->prepare($sql);
    $this->stmt->execute($data);
  }

  // (D) GET ALL EVENTS
  function get () {
    $this->query("SELECT * FROM `events`");
    return $this->stmt->fetchAll();
  }

  // (E) SAVE EVENT
  function save ($txt, $row, $col, $id=null) {
    // (E1) NEW EVENT
    if ($id==null) {
      $sql = "INSERT INTO `events` (`event_txt`, `event_row`, `event_col`) VALUES (?, ?, ?)";
      $data = [$txt, $row, $col];
    }

    // (E2) EDIT EVENT
    else {
      $sql = "UPDATE `events` SET `event_txt`=?, `event_row`=?, `event_col`=? WHERE `event_id`=?";
      $data = [$txt, $row, $col, $id];
    }

    $this->query($sql, $data);
    return true;
  }

  // (F) DELETE EVENT
  function del ($id) {
    $this->query("DELETE FROM `events` WHERE `event_id`=?", [$id]);
    return true;
  }
}

// (G) DATABASE SETTINGS - CHANGE TO YOUR OWN!
define("DB_HOST", "localhost");
define("DB_NAME", "test");
define("DB_CHARSET", "utf8mb4");
define("DB_USER", "root");
define("DB_PASSWORD", "");

// (H) NEW TIMETABLE OBJECT
$_TT = new TimeTable();
Now that the database is covered, we will build a PHP library to work with it. This looks complicated at first, but keep calm and look closely.
- (A, B, H) When
$_TT = new TimeTable()is created, the constructor automatically connects to the database. The destructor closes the connection. - (C) A simple helper function to run an SQL statement.
- (D, E, F) The “actual library functions”.
get()Get all events.save()Save an event.del()Delete an event.
- (G) Self-explanatory. Change the settings to your own.
PART 3) HTML TIMETABLE
<!-- (A) GENERATE TIMETABLE HERE -->
<div id="demo"></div>

<!-- (B) ATTACH TIMETABLE -->
<script>
timetable({
  // (B1) REQUIRED
  target: document.getElementById("demo"),
  x: ["Morning", "Afternoon", "Night"],
  y: ["Mon", "Tue", "Wed", "Thur", "Fri"],

  // (B2) LOAD PHP LIBRARY & OUTPUT ENTRIES
  data: [<?php
    require "2-lib-timetable.php";
    $entries = $_TT->get();
    $len = count($entries);
    $last = $len - 1;
    if ($len>0) { for ($i=0; $i<$len; $i++) {
      $entry = $entries[$i];
      printf("{txt:'%s',row:'%s',col:'%s',color:'#696a07',bg:'#fffac0'}%s",
        $entry["event_txt"], $entry["event_row"], $entry["event_col"],
        $i!=$last ? "," : ""
      );
    }}
  ?>],

  // (B3) OPTIONAL
  gridX: "100px repeat(3, 1fr)",
  gridY : "50px"
});
</script>
Finally, fetch the entries from the database and output them in HTML… We will not go into the details here, this is another Javascript “timetable widget” that I have created. If you want to know more, I will leave a link below.
EXTRAS
That’s all for the tutorial, and here is a small section on some extras and links that may be useful to you.
WHERE’S THE “ADMIN PANEL”!?
My developer senses are tingling. Lazy trolls are screaming “this is not a complete system”. Yep, this is a tutorial. Build your own admin panel, and design your own interface using whatever frameworks you wish. The library itself is already an “admin panel without user interface”.
<?php
require "2-lib-timetable.php";
$events = $_TT->get(); // GET
$_TT->save("SOME EVENT", "3", "3/5"); // ADD
$_TT->save("SOME OTHER EVENT", "4", "3/5", 123); // EDIT
$_TT->del(123); // DELETE
SUPPORTING MULTIPLE TIMETABLES
- Create another
timetabletable.timetable_idPrimary key, auto-increment.timetable_nameName of timetable.timetable_rowsJSON encoded string indicating rows of the timetable. For example,["Mon","Tue","Wed","Thur","Fri"]timetable_columnsIndicates the columns of the timetable. For example,["Morning","AFternoon","Night"].
- Add
timetable_idinto the existingeventstable. - Modify all the library functions accordingly to include
timetable_id.
USING PHP TO GENERATE THE HTML TIMETABLE
There’s nothing wrong with using Javascript to generate the HTML. But if you want to use PHP to generate the HTML, the timetable is literally a simple CSS grid.
<div class="timetable" style="grid-template-columns: XYZ;">
<!-- FIRST ROW HEADER -->
<div class="cell head"> </div>
<div class="cell head">COLUMN</div>
<div class="cell head">COLUMN</div>
<!-- FOLLOWING ROWS -->
<div class="cell head">ROW</div>
<div class="cell"> </div>
<div class="cell"> </div>
<div class="cell head">ROW</div>
<div class="cell"> </div>
<div class="cell"> </div>
<!-- EVENTS -->
<div class="cell entry" style="grid-area:XYZ; color:white; background:black;">
USE THE LIBRARY TO OUTPUT THE EVENTS
</div>
</div>
LINKS & REFERENCES
- Simple Javascript Timetable – Code Boxx
- CSS grid – MDN
THE END
Thank you for reading, and we have come to the end. I hope that it has helped you to better understand, and if you want to share anything with this guide, please feel free to comment below. Good luck and happy coding!