Welcome to a tutorial on how to create a simple seat reservation form with HTML and Javascript. Need a “nice interface” for your passenger service, room booking, or whatever it is? Well, here’s a simple example – Read on!
TABLE OF CONTENTS
SEAT RESERVATION FORM

All right, let us now get into the reservation form example.
1) HTML PAGE
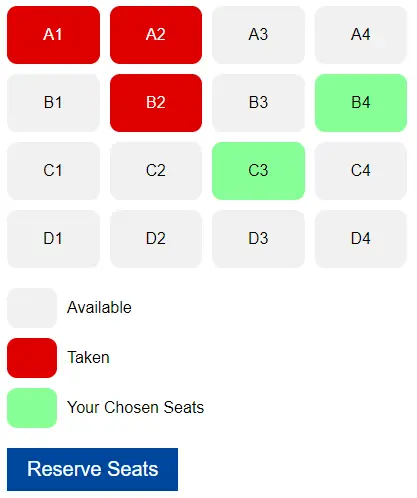
<!-- (A) SEAT LAYOUT -->
<div id="layout"></div>

<!-- (B) LEGEND -->
<div id="legend">
  <div class="seat"></div> <div class="txt">Available</div>
  <div class="seat taken"></div> <div class="txt">Taken</div>
  <div class="seat selected"></div> <div class="txt">Your Chosen Seats</div>
</div>

<!-- (C) SAVE SELECTION -->
<button id="save" onclick="reserve.save()">Reserve Seats</button>
Don’t think this needs a lot of explanation.
- An empty
<div>to generate the seating arrangement, we will use Javascript to do that later. - Colors for available, taken, and selected seats.
- Just a simple “save” button. Feel free to add a
<form>and capture your own required fields – Name, email, telephone, etc…
2) THE JAVASCRIPT
var reserve = {
  // (A) INIT
  init : () => {
    // (A1) GET LAYOUT WRAPPER
    let layout = document.getElementById("layout");

    // (A2) GENERATE SEATS
    for (let i=65; i<=68; i++) { for (let j=1; j<=4; j++) {
      let seat = document.createElement("div");
      seat.innerHTML = String.fromCharCode(i) + j;
      seat.className = "seat";
      seat.onclick = () => reserve.toggle(seat);
      layout.appendChild(seat);
    }}

    // (A3) FOR DEMO ONLY - RANDOM TAKEN SEATS
    let all = document.querySelectorAll("#layout .seat"),
        len = all.length - 1, rnd = [];
    while (rnd.length != 3) {
      let r = Math.floor(Math.random() * len);
      if (!rnd.includes(r)) { rnd.push(r); }
    }
    for (let i of rnd) {
      all[i].classList.add("taken");
      all[i].onclick = "";
    }
  },

  // (B) CHOOSE THIS SEAT
  toggle : seat => seat.classList.toggle("selected"),

  // (C) SAVE RESERVATION
  save : () => {
    // (C1) GET SELECTED SEATS
    let selected = document.querySelectorAll("#layout .selected");

    // (C2) ERROR!
    if (selected.length == 0) { alert("No seats selected."); }

    // (C3) SELECTED SEATS
    else {
      // (C3-1) GET SELECTED SEAT NUMBERS
      let seats = [];
      for (let s of selected) { seats.push(s.innerHTML); }

      // (C3-2) DO SOMETHING WITH IT...
      let data = new FormData();
      data.append("seats", JSON.stringify(seats));
      data.append("name", "JON DOE");
      data.append("email", "JON@DOE.COM");
      fetch("4-dummy.php", {
        method: "POST",
        body : data
      })
      .then(res => res.text())
      .then(txt => console.log(txt));
    }
  }
};
window.addEventListener("DOMContentLoaded", reserve.init);
Not going to explain this line-by-line (very boring), but the essentials:
reserve.init()runs on page load. All it does is generate seats<div class="seat">into<div id="layout">and attach “click to select seat”.- Seats that are already taken are “marked” with
<div class="seat taken">. - To select a seat, we set
<div class="seat selected">.
- Seats that are already taken are “marked” with
- Yep, to select/unselect a seat, we simply toggle the
selectedCSS class. - To get the selected seats, we simply get all of them with
#layout .selected. Thereafter, do whatever is required – Collect user information, submit a form, do your own checks, payment, etc…
3) THE CSS
/* (A) SEAT & "COLOR CODE" */
.seat {
  text-align: center;
  padding: 20px 10px;
  border-radius: 10px;
  background: #f1f1f1;
}
.taken { background: #df0000; color: #fff; }
.selected { background: #87ff96; }

/* (B) SEATS LAYOUT */
#layout {
  max-width: 400px;
  display: grid;
  grid-template-columns: repeat(4, 1fr);
  grid-gap: 10px;
  margin-bottom: 20px;
}

/* (C) LEGEND */
#legend {
  display: grid;
  grid-gap: 10px;
  grid-template-columns: 50px auto ;
}
#legend .txt {
  display: flex;
  align-items: center;
}

/* (D) SAVE */
#save {
  font-size: 20px;
  margin-top: 20px;
  padding: 10px 20px;
  border: 0;
  color: #fff;
  background: #00479f;
}
Well, just a whole bunch of CSS cosmetics. The seat layout <div id="layout"> is structured with CSS grid grid-template-columns. Feel free to change these styles and layouts to your own.
DOWNLOAD & NOTES

Here is the download link to the example code, so you don’t have to copy-paste everything.
SORRY FOR THE ADS...
But someone has to pay the bills, and sponsors are paying for it. I insist on not turning Code Boxx into a "paid scripts" business, and I don't "block people with Adblock". Every little bit of support helps.
Buy Me A Coffee Code Boxx eBooks
EXAMPLE CODE DOWNLOAD
Click here for the source code on GitHub gist, just click on “download zip” or do a git clone. I have released it under the MIT license, so feel free to build on top of it or use it in your own project.
EXTRA BITS & LINKS

That’s all for the tutorial, and here is a small section on some extras and links that may be useful to you.
COMPATIBILITY CHECKS
- Arrow Functions – CanIUse
- CSS Grid – CanIUse
- Fetch – CanIUse
This example will work on all modern “Grade A” browsers.
LINKS & REFERENCES
THE END

Thank you for reading, and we have come to the end. I hope that it has helped you to better understand, and if you want to share anything with this guide, please feel free to comment below. Good luck and happy coding!