Welcome to a beginner’s tutorial on how to save an HTML form into the database in NodeJS. So you have just started with NodeJS, and wondering how to submit and save an HTML form into the database? Well, read on for the example!
TABLE OF CONTENTS
DOWNLOAD & NOTES
Here is the download link to the example code, so you don’t have to copy-paste everything.
EXAMPLE CODE DOWNLOAD
Just click on “download zip” or do a git clone. I have released it under the MIT license, so feel free to build on top of it or use it in your own project.
SORRY FOR THE ADS...
But someone has to pay the bills, and sponsors are paying for it. I insist on not turning Code Boxx into a "paid scripts" business, and I don't "block people with Adblock". Every little bit of support helps.
Buy Me A Coffee Code Boxx eBooks
NODEJS SAVE HTML FORM INTO DATABASE
All right, let us now get into the details of saving an HTML form into the database in Node JS.

QUICK SETUP
Run npm i sqlite3 express multer to install the required modules.
PART 1) DUMMY DATABASE
1A) THE SQL
CREATE TABLE dummy (
  id INTEGER,
  email TEXT NOT NULL,
  txt TEXT NOT NULL,
  PRIMARY KEY("id" AUTOINCREMENT)
);
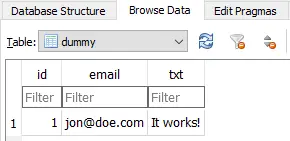
For this example, we will be working with this simple table with only 3 fields:
idPrimary key, auto-increment.emailEmail of the user.txtWhatever text or random content.
1B) CREATE THE DATABASE FILE
// (A) REQUIRED MODULES
const fs = require("fs"),
sqlite = require("sqlite3");

// (B) CREATE DUMMY DATABASE
const db = new sqlite.Database("dummy.db", err => {
  if (err) { console.log(err); }
  else {
    db.exec(fs.readFileSync("1a-dummy.sql", "utf8"));
    db.close();
    console.log("Database created");
  }
});
Don’t think this one needs a lot of explanation – We are just reading the above SQL file and creating the actual dummy.db.
PART 2) DUMMY HTML FORM
2A) THE HTML
<!-- (A) HTML FORM -->
<form method="post" id="demo" onsubmit="return goForm()">
  <label>Email</label>
  <input type="email" name="email" required value="jon@doe.com">
  <label>Text</label>
  <input type="text" name="txt" required value="It works!">
  <input type="submit" value="Go!">
</form>
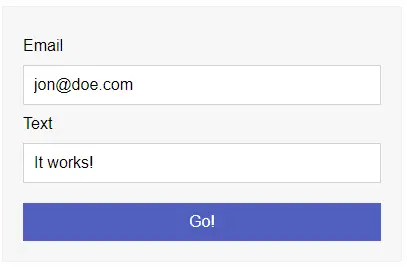
Well, just a “regular Joe HTML form”.
2B) THE JAVASCRIPT
<!-- (B) AJAX SUBMIT -->
<script>
function goForm () {
  // (B1) GET HTML FORM
  var data = new FormData(document.getElementById("demo"));

  // (B2) AJAX SUBMIT
  fetch("/go", { method:"POST", body:data })
  .then(res => res.text())
  .then(txt => alert(txt))
  .catch(err => console.error(err));
  return false;
}
</script>
For the form submission, we will be using fetch() to send the HTML form via POST to /go.
PART 3) NODEJS EXPRESS SERVER
// (A) LOAD MODULES
const path = require("path"),
      multer = require("multer"),
      bodyParser = require("body-parser"),
      express = require("express"),
      sqlite = require("sqlite3");

// (B) EXPRESS SERVER & MIDDLEWARE
const app = express();
app.use(multer().array());
app.use(bodyParser.urlencoded({ extended: false }));

// (C) SERVE DUMMY HTML FORM
app.get("/", (req, res) => res.sendFile(path.join(__dirname, "/2-form.html")));

// (D) PROCESS SUBMITTED FORM
app.post("/go", (req, res) => {
  // (D1) SAVE INTO DATABASE
  let db = new sqlite.Database("dummy.db");
  db.run(`INSERT INTO dummy (email, txt) VALUES (?,?)`, [
  req.body.email, req.body.txt
  ], function (err) {
    if (err) { console.log(err); }
    else { console.log(`INSERTED - ID ${this.lastID}`); }
  });
  db.close();

  // (D2) RESPOND
  res.status(200);
  res.send("OK");
});

// (E) START!
app.listen(80, () => console.log(`Server running at port 80`));
Finally, we will build an HTTP server with Express.
- Load the necessary modules…
- Create the Express HTTP server, use
multerandbody-parserto properly “decode” the POST. - Serve
2-form.htmlat/. - When the form is submitted to
/go, this section willINSERTit into the database. - Captain Obvious to the rescue – Start the HTTP server.
The end.
EXTRAS
That’s all for the tutorial, and here is a small section on some extras and links that may be useful to you.
SMALL NOTES ON SQLITE
Horray, this example works. With SQLite, there’s no need to download and install “crazy database stuff”. But take note – SQLite is a great tool for learning, but it is bad in terms of performance. So please pick up a database in your own free time, it does not take that long – MYSQL, POSTGRESQL, MSSQL, MongoDB, etc…
COMPATIBILITY CHECKS
- Arrow Functions – CanIUse
- Fetch – CanIUse
This example works on all modern browsers.
LINKS & REFERENCES
- Express – NodeJS Web Server
THE END
Thank you for reading, and we have come to the end. I hope that it has helped you to better understand, and if you want to share anything with this guide, please feel free to comment below. Good luck and happy coding!
