Welcome to a tutorial on how to create a simple address book with pure Javascript. Yep, there are already a ton of such “address book apps” all over the Internet. So here is one that is slightly different – An address book web app that works offline and is installable. Read on!
TABLE OF CONTENTS
JAVASCRIPT ADDRESS BOOK

All right, let us now get into more details on how the Javascript address book works.
PART 1) THE HTML
<!-- (A) ADD/EDIT ENTRY FORM -->
<div id="abForm"><form onsubmit="return ab.save()">
  <div id="abClose" class="material-icons" onclick="ab.toggle(false)">
    close
  </div>
  <input type="hidden" id="abID">
  <label>Name</label>
  <input type="text" id="abName" required>
  <label>Email</label>
  <input type="email" id="abEmail">
  <label>Tel</label>
  <input type="text" id="abTel">
  <label>Address</label>
  <input type="text" id="abAddr">
  <input type="submit" value="Save" id="abGo">
</form></div>

<!-- (B) ENTRIES LIST -->
<div id="abWrap">
  <div id="abHead">
    <h2>ADDRESS BOOK</h2>
    <div id="abAdd" class="material-icons" onclick="ab.toggle(true)">
      add
    </div>
  </div>
  <div id="abList"></div>
</div>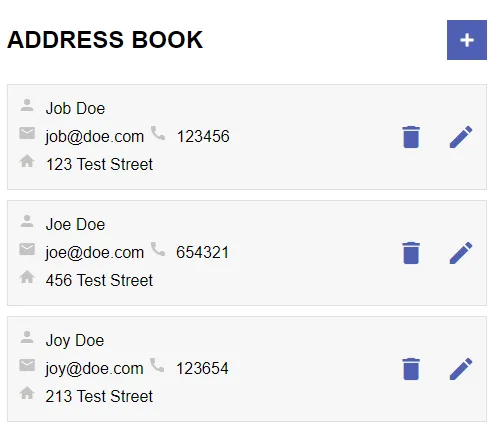
The HTML should be very straightforward with only 2 sections.
- Add/edit address entry form.
<div>wrapper to show the list of address entries.
PART 2) THE JAVASCRIPT
2A) INIT
var ab = {
  // (A) INIT
  hForm : null, // html add/edit form
  hID : null, hName : null, hEmail : null, hTel : null, hAddr : null,
  data : [], // address book entries
  hList : null, // html entries list
  init : () => {
    // (A1) GET HTML ELEMENTS
    ab.hID = document.getElementById("abID");
    ab.hForm = document.getElementById("abForm");
    ab.hName = document.getElementById("abName");
    ab.hEmail = document.getElementById("abEmail");
    ab.hTel = document.getElementById("abTel");
    ab.hAddr = document.getElementById("abAddr");
    ab.hList = document.getElementById("abList");

    // (A2) LOAD ENTRIES FROM LOCAL STORAGE
    let data = localStorage.getItem("ab");
    if (data != null) { ab.data = JSON.parse(data); }

    // (A3) DRAW ADDRESS ENTRIES
    ab.draw();
  },

  // ...
};
window.addEventListener("load", ab.init);
On window load, ab.init() will deal with… initiating the app. Nothing much really:
- (A1) Get all the related HTML elements.
- (A2) Restore the address entries from
localStorageand put them intoab.data. - (A3) Draw the HTML address entries.
For the beginners, localStorage is simply one of the possible mechanics for persistent storage. The data stays when the user closes the browser, and can be restored when the page is opened later. Although it can still be cleared with a “clear all browser cache”.
2B) HTML INTERFACE HELPER FUNCTION
// (B) TOGGLE SHOW/HIDE ENTRY FORM
toggle : id => {
  // (B1) CLOSE & HIDE
  if (id === false) {
    ab.hID.value = "";
    ab.hName.value = "";
    ab.hEmail.value = "";
    ab.hTel.value = "";
    ab.hAddr.value = "";
    ab.hForm.classList.remove("show");
  }

  // (B2) SHOW
  else {
    // (B2-1) EDIT MODE
    if (Number.isInteger(id)) {
      ab.hID.value = id;
      ab.hName.value = ab.data[id]["n"];
      ab.hEmail.value = ab.data[id]["e"];
      ab.hTel.value = ab.data[id]["t"];
      ab.hAddr.value = ab.data[id]["a"];
    }

    // (B2-2) SHOW ADD/EDIT FORM
    ab.hForm.classList.add("show");
  }
},
Next, ab.toggle() is a simple helper function to show/hide the HTML add/edit address entry form. Take note of the id parameter though.
id == falseWe hide and clear out the entire form.id == trueJust show the form.id == NUMBERSimply put,ab.datais an array of addresses. This “edit mode” will populate the form fields with the selected entry.
2C) SAVE & DELETE ENTRY
// (C) SAVE ADDRESS ENTRY
save : () => {
  // (C1) ENTRY DATA
  let data = {
    n : ab.hName.value,
    e : ab.hEmail.value,
    t : ab.hTel.value,
    a : ab.hAddr.value
  };

  // (C2) ADD/UPDATE ENTRY
  if (ab.hID.value == "") { ab.data.push(data); }
  else { ab.data[ab.hID.value] = data; }

  // (C3) UPDATE LOCAL STORAGE
  localStorage.setItem("ab", JSON.stringify(ab.data));
  ab.toggle(false);
  ab.draw();
  return false;
},

// (D) DELETE ADDRESS ENTRY
del : id => { if (confirm("Delete Entry?")) {
  ab.data.splice(id, 1);
  localStorage.setItem("ab", JSON.stringify(ab.data));
  ab.draw();
}},
Looks complicated, but should not be much trouble if you trace through the code.
ab.save()– We push a new address entry intoab.dataand updatelocalStorage.ab.del()– Remove the selected address entry fromab.dataand updatelocalStorage.
2D) DRAW HTML ADDRESS ENTRIES
// (E) DRAW ADDRESS BOOK ENTRIES
draw : () => {
  ab.hList.innerHTML = "";
  for (let i in ab.data) {
    let row = document.createElement("div");
    row.className = "row";
    row.innerHTML = `<div class="info">
      <div><i class="tag material-icons">person</i> ${ab.data[i]["n"]}</div>
      <div>
        <i class="tag material-icons">email</i> ${ab.data[i]["e"]}
        <i class="material-icons tag">call</i> ${ab.data[i]["t"]}
      </div>
      <div><i class="tag material-icons">home</i> ${ab.data[i]["a"]}</div>
    </div>
    <input type="button" class="material-icons" value="delete" onclick="ab.del(${i})">
    <input type="button" class="material-icons" value="edit" onclick="ab.toggle(${i})">`;
    ab.hList.appendChild(row);
  }
}
Lastly, ab.draw() simply loops through the array of address entries ab.data, and draws the HTML.
PART 3) PROGRESSIVE WEB APP
3A) HTML METADATA
<!-- ANDROID + CHROME + APPLE + WINDOWS APP -->
<meta name="mobile-web-app-capable" content="yes">
<meta name="theme-color" content="white">
<link rel="apple-touch-icon" href="icon-512.png">
<meta name="apple-mobile-web-app-capable" content="yes">
<meta name="apple-mobile-web-app-status-bar-style" content="black">
<meta name="apple-mobile-web-app-title" content="Address Book">
<meta name="msapplication-TileImage" content="icon-512.png">
<meta name="msapplication-TileColor" content="#ffffff">
<!-- WEB APP MANIFEST -->
<!-- https://web.dev/add-manifest/ -->
<link rel="manifest" href="3-manifest.json">
<!-- SERVICE WORKER -->
<script>
if ("serviceWorker" in navigator) {
navigator.serviceWorker.register("4-worker.js");
}
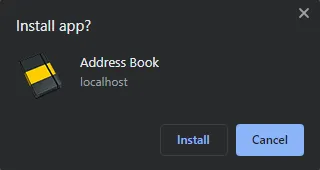
</script>At this stage, we already have a fully functioning app. But to turn this into an “offline-capable and installable web app”, we need to insert a few more things in the <head> section of the page.
- Define the icons… This is kind of a pain as every platform uses a different size. I figure the best way is to provide a huge 512 X 512 icon and let the platforms resize it.
- Add a web manifest file.
- Register a service worker.
3B) WEB MANIFEST
{
  "short_name": "Address",
  "name": "Address Book",
  "icons": [{
    "src": "favicon.png",
    "sizes": "64x64",
    "type": "image/png"
  }, {
    "src": "icon-512.png",
    "sizes": "512x512",
    "type": "image/png"
  }],
  "start_url": "1-address.html",
  "scope": "/",
  "background_color": "white",
  "theme_color": "white",
  "display": "standalone"
}
“Web manifest” sounds scary, but it is what it is. Just a file to state the app name, icons, starting page, theme, settings, and more.
3C) SERVICE WORKER
// (A) CREATE/INSTALL CACHE
self.addEventListener("install", evt => {
  self.skipWaiting();
  evt.waitUntil(
    caches.open("AddressBook")
    .then(cache => cache.addAll([
      "favicon.png",
      "icon-512.png",
      "1-address.html",
      "2-address.js",
      "2-address.css"
    ]))
    .catch(err => console.error(err))
  );
});

// (B) CLAIM CONTROL INSTANTLY
self.addEventListener("activate", evt => self.clients.claim());

// (C) LOAD FROM CACHE FIRST, FALLBACK TO NETWORK IF NOT FOUND
self.addEventListener("fetch", evt => evt.respondWith(
  caches.match(evt.request).then(res => res || fetch(evt.request))
));
For those who have not heard of “service-worker”, it is just a piece of Javascript that runs in the background.
- (A) For this service worker, we will create a new storage cache and save all the necessary HTML, CSS, and Javascript inside. Yes, this is a persistent cache, not the “normal browser cache”.
- (C) “Hijack” the browser fetch requests. If the requested file is found in the cache, use it. If not, fall back to loading from the network.
In other words, this service worker is used to support “offline mode” by saving all the necessary files into the cache.
DOWNLOAD & NOTES

Here is the download link to the example code, so you don’t have to copy-paste everything.
SORRY FOR THE ADS...
But someone has to pay the bills, and sponsors are paying for it. I insist on not turning Code Boxx into a "paid scripts" business, and I don't "block people with Adblock". Every little bit of support helps.
Buy Me A Coffee Code Boxx eBooks
EXAMPLE CODE DOWNLOAD
Click here for the source code on GitHub gist, just click on “download zip” or do a git clone. I have released it under the MIT license, so feel free to build on top of it or use it in your own project.
EXTRA BITS & LINKS

That’s all for the tutorial, and here is a small section on some extras and links that may be useful to you.
NOTES ON PERFORMANCE
localStoragecan only accept flat strings.- As you can see, we have to JSON encode
ab.datainto a string before storing it intolocalStorage. - To load, we do the opposite of fetching the string from
localStorage, then JSON decode it back into an array.
This works. But it will take a massive performance hit when it comes to dealing with massive data sets. So if you are interested, check out indexed databases. I will leave a link below.
COMPATIBILITY CHECKS
- Arrow Functions – CanIUse
- Add To Home Screen – CanIUse
- Service Worker – CanIUse
Take note that “add to home screen” will only work on certain browsers at the time of writing.
LINKS & REFERENCES
- Address Book With PHP MySQL – Code Boxx
- Indexed DB API – MDN
THE END

Thank you for reading, and we have come to the end. I hope that it has helped you to better understand, and if you want to share anything with this guide, please feel free to comment below. Good luck and happy coding!