Welcome to a tutorial on how to implement Google Cloud Text-to-Speech in PHP. So you are working on a PHP text-to-speech project, but only to find that Google’s documentation is kind of all over the place? Well, here is a simple working example of mine – Read on!
TABLE OF CONTENTS
DOWNLOAD & NOTES
Here is the download link to the example code, so you don’t have to copy-paste everything.
EXAMPLE CODE DOWNLOAD
Just click on “download zip” or do a git clone. I have released it under the MIT license, so feel free to build on top of it or use it in your own project.
SORRY FOR THE ADS...
But someone has to pay the bills, and sponsors are paying for it. I insist on not turning Code Boxx into a "paid scripts" business, and I don't "block people with Adblock". Every little bit of support helps.
Buy Me A Coffee Code Boxx eBooks
PHP TEXT-TO-SPEECH WITH GOOGLE CLOUD
All right, let us now get into the steps of creating a simple PHP text-to-speech app with Google Cloud.
PART 1) GOOGLE CLOUD ACCOUNT & TTS LIBRARY
Before we get into the code, there are quite a number of things you have to do.
1A) REGISTRATION
First, go through the “baptism by registration”:
- Register with Google Cloud if you have not already done so.
- Follow these instructions –
- Create a project.
- Enable text-to-speech API.
- Create a service account.
- Create a JSON key for your app.
1B) KEEP THE CREDENTIALS SAFE
Now, it’s easier to just download the credentials as a key.json file. But remember to keep it safe, there are 2 simple ways:
- If your public HTTP folder is at
D:\http, just put the credentials outside. Maybe atD:\key.json. - Put the credentials in a protected folder.
- Create a
libfolder. - Create a
lib/.htaccessfile –deny from all. - Move
key.jsoninsidelib/. - This is for Apache only. NGINX and IIS users – Do your own homework.
- Create a
1C) GET THE TTS LIBRARY
- Install Composer if you have not already done so.
- Open the terminal, and navigate to your project folder –
cd YOUR/PROJECT/. - Run
composer require google/cloud-text-to-speech.
Yep. That’s it for the “setup”.
PART 2) GET AVAILABLE VOICES
<?php
// (A) LOAD TTS LIBRARY
require "vendor/autoload.php";
use Google\ApiCore\ApiException;
use Google\Cloud\TextToSpeech\V1\ListVoicesResponse;
use Google\Cloud\TextToSpeech\V1\TextToSpeechClient;
$textToSpeechClient = new TextToSpeechClient(["credentials" => "key.json"]); // CHANGE TO YOUR OWN!

// (B) SAVE ENTIRE LIST TO FILE
try {
  $response = $textToSpeechClient->listVoices();
  file_put_contents("voices.json", $response->serializeToJsonString());
} catch (ApiException $ex) { print_r($ex); }
unset($response);

// (C) FILTER ENGLISH ONLY
$all = json_decode(file_get_contents("voices.json"), 1);
$en = [];
foreach ($all["voices"] as $v) { if (substr($v["name"], 0, 2) == "en") {
  $en[] = [
    "code" => $v["languageCodes"][0],
    "name" => $v["name"],
    "gender" => $v["ssmlGender"]
  ];
}}

// (D) SAVE FILTERED LIST
file_put_contents("voices-filtered.json", json_encode($en));
echo "OK";
Google offers a whole load of different voices and languages, we can use the library to get all of them – $textToSpeechClient->listVoices(). In this script, we generate:
voices.jsonList of all the voices.voices-filtered.jsonEnglish voices only.
Feel free to modify this to fit your own needs. Save the list into a database, or even generate HTML dropdown options directly.
PART 3) TEXT INPUT PAGE
<form method="post" target="_blank" action="3-process.php">
<label>Voice</label>
<select name="voice"><?php
$all = json_decode(file_get_contents("voices-filtered.json"), 1);
foreach ($all as $v) {
printf("<option value='%s@%s'>%s (%s)</option>",
$v["code"], $v["name"],
$v["name"], $v["gender"]
);
}
?></select>
<label>Text</label>
<textarea name="txt" required></textarea>
<label>Rate</label>
<input type="range" min="0.5" max="4.0" value="1" step="0.5" name="rate" oninput="this.nextElementSibling.value = this.value">
<output class="hint">1</output>
<label>Pitch</label>
<input type="range" min="-20" max="20" value="0" step="1" name="pitch" oninput="this.nextElementSibling.value = this.value">
<output class="hint">0</output>
<label>Gain</label>
<input type="range" min="-15" max="15" value="5" step="1" name="gain" oninput="this.nextElementSibling.value = this.value">
<output class="hint">5</output>
<input type="submit" value="Go!">
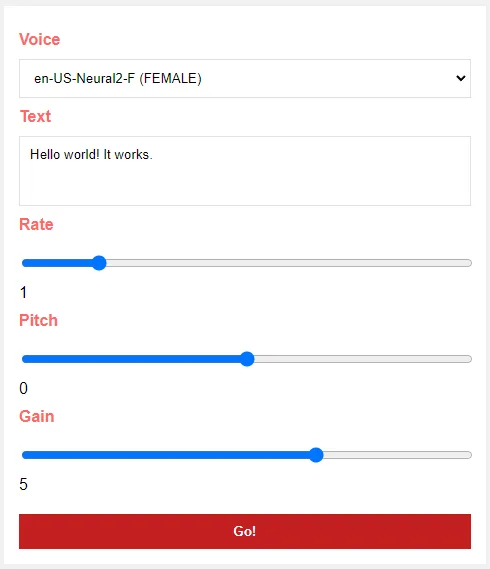
</form>Just a simple HTML form to select the voice, enter the text, rate, pitch, and gain.
PART 4) PROCESS TEXT-TO-SPEECH
<?php
// (A) LOAD TTS LIBRARY
require "vendor/autoload.php";
use Google\ApiCore\ApiException;
use Google\Cloud\TextToSpeech\V1\AudioConfig;
use Google\Cloud\TextToSpeech\V1\AudioEncoding;
use Google\Cloud\TextToSpeech\V1\SsmlVoiceGender;
use Google\Cloud\TextToSpeech\V1\SynthesisInput;
use Google\Cloud\TextToSpeech\V1\SynthesizeSpeechResponse;
use Google\Cloud\TextToSpeech\V1\TextToSpeechClient;
use Google\Cloud\TextToSpeech\V1\VoiceSelectionParams;

// (B) TEXT INPUT
$input = new SynthesisInput();
$input->setText($_POST["txt"]);
// $input->setSsml("<speak>" . $_POST["txt"] . "</speak>");

// (C) VOICE SETTING
$v = explode("@", $_POST["voice"]);
$voice = new VoiceSelectionParams();
$voice->setLanguageCode($v[0]);
$voice->setName($v[1]);
$audioConfig = new AudioConfig();
$audioConfig->setAudioEncoding(AudioEncoding::MP3);
$audioConfig->setSpeakingRate($_POST["rate"]); // 0.25 to 4.0
$audioConfig->setPitch($_POST["pitch"]); // -20 to 20
$audioConfig->setVolumeGainDb($_POST["gain"]); // -96 to 16

// (D) TEXT TO SPEECH
$textToSpeechClient = new TextToSpeechClient(["credentials" => "key.json"]); // CHANGE TO YOUR OWN!
$res = $textToSpeechClient->synthesizeSpeech($input, $voice, $audioConfig);
file_put_contents("demo.mp3", $res->getAudioContent());
echo "OK";
Lastly, we simply “forward” the submitted form to Google Cloud. Save the MP3 file to wherever you want.
EXTRAS
That’s all for the tutorial, and here is a small section on some extras and links that may be useful to you.
SPEECH SYNTHESIS MARKUP LANGUAGE (SSML)
Just a quick sidenote that some voices in Cloud Text-To-Speech support SSML. For the uninitiated, you can call his “fine-tuning”. For example, adding emphasis:
<speak>
  This is <emphasis level="strong">SPARTA</emphasis>!
</speak>
There are a lot more, check out the link below if you want to learn more.
LINKS & REFERENCES
- Google Cloud Text To Speech PHP – GitHub
- SSML – Google Cloud
THE END
Thank you for reading, and we have come to the end. I hope that it has helped you to better understand, and if you want to share anything with this guide, please feel free to comment below. Good luck and happy coding!