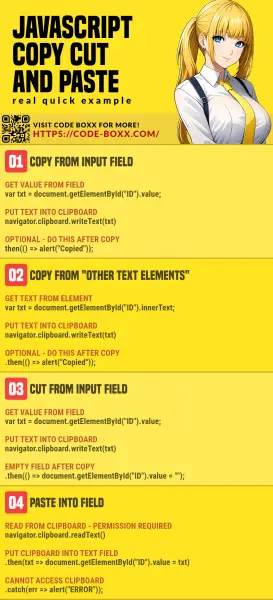
Welcome to a quick tutorial on how to copy, cut, and paste with Javascript. The Stone Age of the Internet is long over, and yes, we can use Javascript to access the user’s clipboard.
- Use
navigator.clipboard.writeText("TEXT")to copy a block to text into the clipboard.var txt = document.getElementById("TEXT-FIELD").value;navigator.clipboard.writeText(txt);
- Use
navigator.clipboard.readText()to access the clipboard and do a paste.let text = navigator.clipboard.readText();text.then(txt => { document.getElementById("TEXT-FIELD").value = txt; });
Yep, that’s all for the basics. But the clipboard API is actually capable of copying images too – Read on for more examples!
TLDR – QUICK SLIDES
[web_stories_embed url=”https://code-boxx.com/web-stories/javascript-clipboard-copy-cut-paste/” title=”Javascript Clipboard – Copy Cut Paste” poster=”https://code-boxx.com/wp-content/uploads/2021/11/STORY-JS-20230518.webp” width=”360″ height=”600″ align=”center”]
Fullscreen Mode – Click Here
TABLE OF CONTENTS
JAVASCRIPT COPY CUT PASTE
All right, let us now walk through the copy-cut-paste trinity in this section with a few examples.
EXAMPLE 1) COPY TEXT FROM AN INPUT FIELD
<script>
// (A) COPY TEXT TO CLIPBOARD
function jscopyA () {
  // (A1) GET TEXT FROM TEXT FIELD
  var txt = document.getElementById("demoA").value;

  // (A2) PUT TEXT INTO CLIPBOARD
  navigator.clipboard.writeText(txt)

  // (A3) OPTIONAL - DO THIS AFTER COPY
  .then(() => alert("Copied"));
}
</script>

<!-- (B) HTML -->
<input type="text" id="demoA" value="Hello World!" readonly>
<input type="button" value="Copy Text Field" onclick="jscopyA()">
Yep, copying is as simple as that, a 2-steps process –
- First, get the text from the input field –
var txt = document.getElementById("demoA").value - Then put the text into the clipboard –
navigator.clipboard.writeText(txt)
EXAMPLE 2) COPY TEXT CONTENT FROM HTML ELEMENT
<script>
// (A) COPY TEXT TO CLIPBOARD
function jscopyB () {
  // (A1) GET TEXT FROM TEXT FIELD
  var txt = document.getElementById("demoB").innerText;

  // (A2) PUT TEXT INTO CLIPBOARD
  navigator.clipboard.writeText(txt)

  // (A3) OPTIONAL - DO THIS AFTER COPY
  .then(() => alert("Copied"));
}
</script>

<!-- (B) HTML -->
<p id="demoB">This is a <strong>random</strong> string.</p>
<input type="button" value="Copy Text Content" onclick="jscopyB()">
This is a random string.
Copying the text content HTML elements is pretty much the same process.
- Get the text from the HTML element –
var txt = document.getElementById("demoB").innerText - Put the text into the clipboard –
navigator.clipboard.writeText(txt).
EXAMPLE 3) COPY IMAGE INTO CLIPBOARD
<script>
// (A) COPY IMAGE TO CLIPBOARD
function jscopyC () {
  // (A1) FETCH IMAGE
  fetch ("cherry.png")
  .then (res => res.blob())
  .then (blob => {
    // (A2) IMAGE BLOB TO CLIPBOARD
    navigator.clipboard.write([new ClipboardItem({[blob.type]: blob})])

    // (A3) OPTIONAL - DO THIS AFTER COPY
    .then(() => alert("Copied"));
  });
}
</script>

<!-- (B) HTML -->
<input type="button" value="Copy" onclick="jscopyC()">
Yes, we can also copy an image. Just put the image blob data into the clipboard. But please take note that at the time of writing, Chrome only supports PNG files. All Chromium-based browsers should also have the same restriction – Firefox, Edge, and Opera.
EXAMPLE 4) CUT TEXT FROM INPUT FIELD
<script>
// (A) CUT TEXT TO CLIPBOARD
function jscut () {
  // (A1) GET TEXT FROM TEXT FIELD
  var txt = document.getElementById("demoD").value;

  // (A2) PUT TEXT INTO CLIPBOARD
  navigator.clipboard.writeText(txt)

  // (A3) EMPTY TEXT FIELD AFTER COPY
  .then(() => document.getElementById("demoD").value = "");
}
</script>

<!-- (B) HTML -->
<input type="text" id="demoD" value="Hello World!" readonly>
<input type="button" value="Cut" onclick="jscut()">
Look no further, this is the same as the previous copy example. It’s just that we clear the text field after copying the text to the clipboard.
EXAMPLE 5) PASTE TEXT FROM THE CLIPBOARD
<script>
// (A) PASTE FROM CLIPBOARD
function jspaste () {
  // (A1) READ TEXT FROM CLIPBOARD - PERMISSION REQUIRED
  navigator.clipboard.readText()

  // (A2) PUT CLIPBOARD INTO TEXT FIELD
  .then(txt => document.getElementById("demoE").value = txt)

  // (A3) OPTIONAL - CANNOT ACCESS CLIPBOARD
  .catch(err => alert("Please allow clipboard access permission"));
}
</script>

<!-- (B) HTML -->
<input type="text" id="demoE">
<input type="button" value="Paste" onclick="jspaste()">
No need to panic, pasting is literally a simple 2 steps:
- Read the text from the clipboard
navigator.clipboard.readText(). Please take note that the user needs to grant access permission, we cannot do anything if the access is denied. - Simply put the clipboard text into where you want –
.then(txt => { document.getElementById("TARGET").innerHTML = txt; })
EXAMPLE 6) COPY & CUT WITH EXEC COMMAND (DEPRECATED!)
<script>
// (A) COPY
function oldcopy () {
  document.getElementById("demoF").select();
  document.execCommand("copy");
  alert("Text copied");
}

// (B) CUT
function oldcut () {
  document.getElementById("demoF").select();
  document.execCommand("cut");
  alert("Text copied");
}
</script>

<!-- (B) HTML -->
<input type="text" id="demoF" value="Foo Bar">
<input type="button" value="Copy" onclick="oldcopy()">
<input type="button" value="Cut" onclick="oldcut()">
Lastly, this is probably what you see everywhere on the Internet, using execCommand() to copy and cut. But please take extra note – As at the time of writing, it has been deprecated. Do not use this anymore.
DOWNLOAD & NOTES
Here is the download link to the example code, so you don’t have to copy-paste everything.
SORRY FOR THE ADS...
But someone has to pay the bills, and sponsors are paying for it. I insist on not turning Code Boxx into a "paid scripts" business, and I don't "block people with Adblock". Every little bit of support helps.
Buy Me A Coffee Code Boxx eBooks
EXAMPLE CODE DOWNLOAD
Click here for the source code on GitHub gist, just click on “download zip” or do a git clone. I have released it under the MIT license, so feel free to build on top of it or use it in your own project.
EXTRA BITS & LINKS
That’s all for this tutorial, and here is a small section on some extras and links that may be useful to you.
LINKS & REFERENCES
- Interact with the clipboard – MDN
- Clipboard API – MDN
- Browser Compatibility for Clipboard API – CanIUse
- Browser Compatibility for exec command – CanIUse
TUTORIAL VIDEO
INFOGRAPHIC CHEAT SHEET

THE END
Thank you for reading, and we have come to the end of this guide. I hope that it has helped you with your project, and if you want to share anything with this guide, please feel free to comment below. Good luck and happy coding!
