Welcome to a quick tutorial on how to create unselectable text in HTML and Javascript. So you want to stop people from highlighting text on your webpage? The easy way to create unselectable in HTML is to add * { user-select: none } in the CSS. That’s all. But read on if you are looking for more examples and alternatives!
TABLE OF CONTENTS
DOWNLOAD & NOTES
Here is the download link to the example code, so you don’t have to copy-paste everything.
EXAMPLE CODE DOWNLOAD
Click here to download | Example on CodePen
The example code is released under the MIT license, so feel free to build on top of it or use it in your own project.
SORRY FOR THE ADS...
But someone has to pay the bills, and sponsors are paying for it. I insist on not turning Code Boxx into a "paid scripts" business, and I don't "block people with Adblock". Every little bit of support helps.
Buy Me A Coffee Code Boxx eBooks
UNSELECTABLE TEXT IN HTML JS
All right, let us now walk through the examples to disable text highlight in HTML and Javascript.
TUTORIAL VIDEO
1) CSS DISABLE USER SELECT
<style>
.nohigh { user-select: none; }
.nohigh::selection { background: transparent; }
</style>

<p>This can be selected.</p>
<p class="nohigh">This cannot be selected.</p>
This can be selected.
This cannot be selected.
.nohigh { user-select: none }As in the introduction above, this is all we need to stop people from highlighting a block of text..nohigh::selection { background: transparent; }An optional “trick” to hide the highlight, confuse people shoulduser-select: nonefails.
2) JAVASCRIPT DISABLE SELECT
<script>
window.addEventListener("load", () => {
  for (let a of document.getElementsByClassName("nohigh")) {
    a.addEventListener("selectstart", e => e.preventDefault());
  }
});
</script>

<p>This can be selected.</p>
<p class="nohigh">This cannot be selected.</p>
This can be selected.
This cannot be selected.
This is a Javascript alternative to prevent text highlighting.
for (let a of document.getElementsByClassName("nohigh"))On window load, we loop through all elements wilnohighCSS class.a.addEventListener(...)When the user starts hightlighting, we prevent the default action (cancel the text selection).- But take note, the user can bypass this “protection” by starting the highlight from “This can be selected”.
3) JAVASCRIPT CHECK SELECTED
<script>
window.addEventListener("mouseup", () => {
  // (A) GET SELECTED RANGE
  let sel = window.getSelection();

  // (B) CHECK SELECTED RANGE
  if (sel.type == "Range") {
    // (B1) GET RANGE + START ELEMENT + END ELEMENT
    let rng = sel.getRangeAt(0),
        start = rng.startContainer.parentElement,
        end = rng.endContainer.parentElement,
        check = start;

    // (B2) CANCEL SELECTION IF ELEMENT CONTAINS .NOHIGH
    while (true) {
      if (check.classList.contains("nohigh")) {
        sel.removeAllRanges(); break;
      }
      if (check==end) { break; }
      check = check.nextElementSibling;
      if (check==null) { break; }
    }
  }
});
</script>

<p>This can be selected.</p>
<p class="nohigh">This cannot be selected.</p>
This can be selected.
This cannot be selected.
TLDR – Check the highlighted parts, cancel the selection if any selected element contains nohigh CSS class.
EXTRAS
That’s all for this guide, and here is a small section on some extras and links that may be useful to you.
ALL EFFORT FOR NO PROTECTION
Yes, we can implement all of the above “anti-highlighting protection”. But it will not stop the advanced users, as there are plenty of ways to bypass that “no text select”:
- Right-click > View source code > Copy.
- Right-click > Inspect element > Copy.
- Save HTML page as > Copy.
- Print as PDF > Copy.
I mean, having a lock is better than none… But is it really worth all the trouble? You decide.
LINKS & REFERENCES
- User Select – MDN
- Overriding The Default Text Selection Color With CSS – CSS Tricks
- Javascript: Disable Text Select – Stack Overflow
- Disable Copy Text In CSS & Javascript – Code Boxx
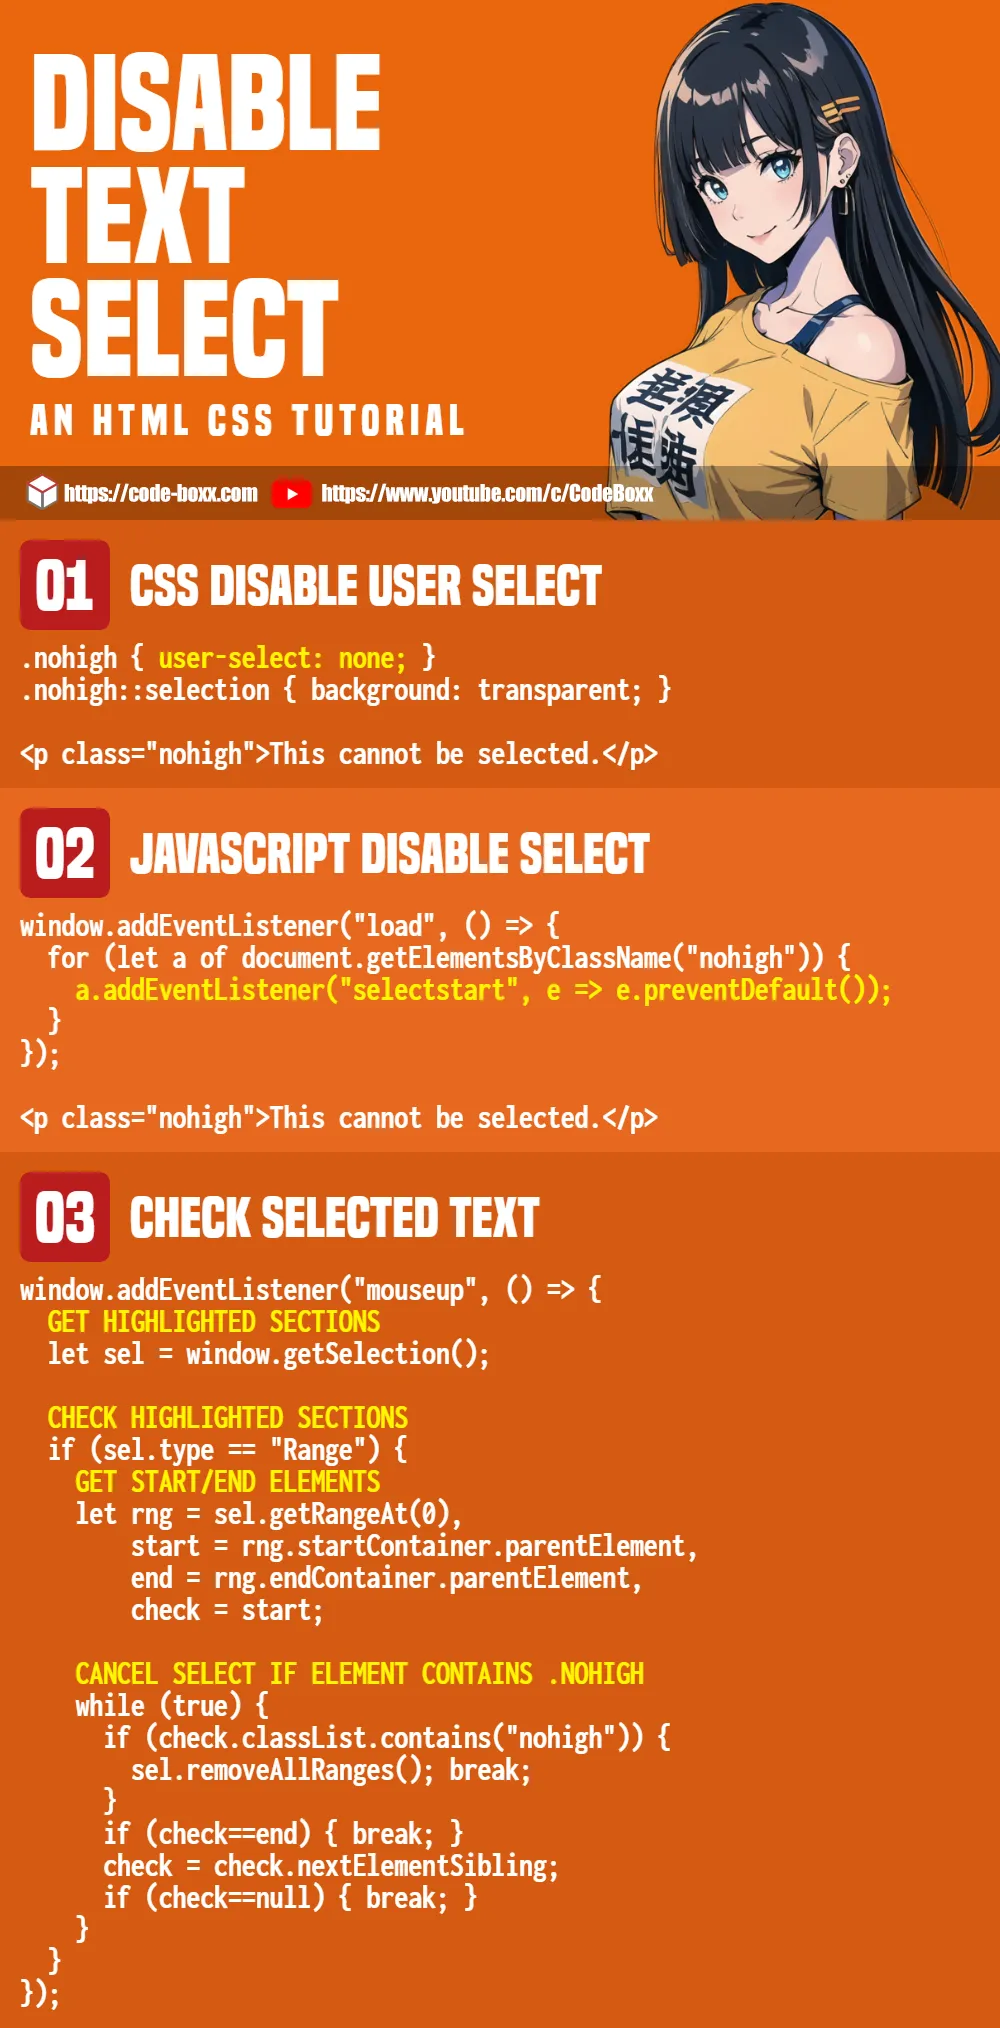
INFOGRAPHIC CHEAT SHEET
THE END
Thank you for reading, and we have come to the end of this guide. I hope that it has helped you with your project, and if you want to share anything with this guide, please feel free to comment below. Good luck and happy coding!