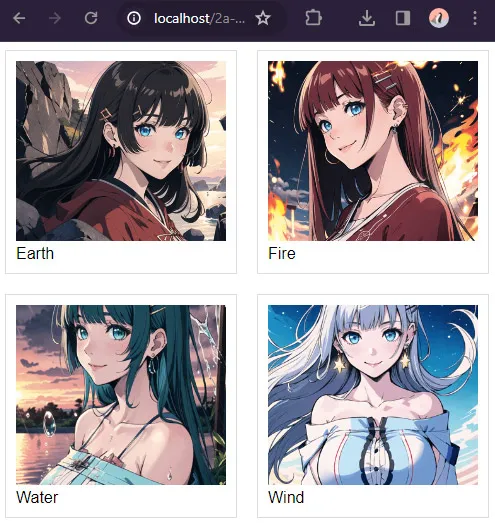
Welcome to a quick tutorial on how to create a very simple PHP image gallery. Tired of all those complicated gallery plugins on the Internet?
Creating a no-database PHP image gallery is as easy as getting a list of image files using glob() and outputting them in HTML.
$images = glob("PATH/GALLERY/*.{jpg,jpeg,gif,png,bmp,webp}", GLOB_BRACE);foreach ($images as $i) { echo "<img src='gallery/". rawurlencode(basename($i)) ."'>"; }
Yep, just like that in 1 minute. But how does this work exactly? Let us walk through a no gimmicks image gallery in this guide – Directly reads image files from a folder, no database required. Read on!
TABLE OF CONTENTS
DOWNLOAD & NOTES
Here is the download link to the example code, so you don’t have to copy-paste everything.
EXAMPLE CODE DOWNLOAD
The example code is released under the MIT license, so feel free to build on top of it or use it in your own project.
SORRY FOR THE ADS...
But someone has to pay the bills, and sponsors are paying for it. I insist on not turning Code Boxx into a "paid scripts" business, and I don't "block people with Adblock". Every little bit of support helps.
Buy Me A Coffee Code Boxx eBooks
PHP SIMPLE IMAGE GALLERY
All right, let us now get into creating the very basic image gallery – Requiring only a few lines of PHP code, it’s so simple that you will laugh all the way to the moon.
TUTORIAL VIDEO
STEP 1) GET IMAGES & OUTPUT AS HTML
<!-- (A) CSS & JS -->
<link href="1b-gallery.css" rel="stylesheet">
<script src="1c-gallery.js"></script>

<div class="gallery"><?php
  // (B) GET IMAGES IN GALLERY FOLDER
  $dir = __DIR__ . DIRECTORY_SEPARATOR . "gallery" . DIRECTORY_SEPARATOR;
  $images = glob("$dir*.{jpg,jpeg,gif,png,bmp,webp}", GLOB_BRACE);

  // (C) OUTPUT IMAGES
  foreach ($images as $i) {
    printf("<img src='gallery/%s'>", rawurlencode(basename($i)));
  }
?></div>
Yep, that’s all to the gallery page. As in the introduction, all we are doing here is –
- (B) Get a list of image files from the gallery folder using
glob(). - (C) Output them as HTML
<img>tags in<div class="gallery">.
STEP 2) CSS GRID LAYOUT
/* (A) GALLERY WRAPPER */
.gallery {
  /* (A1) GRID LAYOUT - 3 IMAGES PER ROW */
  display: grid;
  grid-template-columns: repeat(3, minmax(0, 1fr));
  grid-gap: 20px;

  /* (A2) OPTIONAL WIDTH RESTRICT */
  max-width: 1000px;
  margin: 0 auto;
  overflow: hidden;
}

/* (B) GALLERY IMAGES */
.gallery img {
  /* (B1) DIMENSION */
  width: 100%;
  height: 180px; /* optional */
  padding: 10px;

  /* (B2) COLORS */
  border: 1px solid #ddd;
  background: #fff;

  /* (B3) IMAGE RESIZE */
  /* cover | contain | fill | scale-down */
  object-fit: cover;
}

/* (C) ON SMALL SCREENS - 2 IMAGES PER ROW */
@media only screen and (max-width: 600px) {
  .gallery {
    grid-template-columns: repeat(2, minmax(0, 1fr));
  }
}

/* (D) OPTIONAL ZOOM ON HOVER */
.gallery img:hover {
  z-index: 9;
  transform: scale(1.3);
  /* linear | ease | ease-in | ease-out | ease-in-out */
  transition: transform ease 0.5s;
}

/* (E) FULLSCREEN MODE */
.gallery img.full {
  position: fixed;
  top: 0; left: 0; z-index: 999;
  width: 100vw; height: 100%;
  object-fit: contain;
  background: rgba(0, 0, 0, 0.7);
}
.gallery img.full:hover {
  z-index: 999;
  transform: none;
}
Of course, we are not so “barbaric” to throw out raw images without cosmetics.
- (A1)
display: grid; grid-template-columns: repeat(3, minmax(0, 1fr));will lay out in a “nice gallery format” of 3 images per row. - (B)
width: 100%; height: 180px;to set a “uniform dimension” on all images. - (B)
object-fitis the “image scale to fit” behavior. Change this and see for yourself, choose one that you like. - (C) On smaller screens, change the layout to 2 images per row.
- (E) When the user clicks on an image, we toggle a
.fullCSS class on it. Long story short,.fullsimply sets the image to cover the entire screen.
STEP 3) JAVASCRIPT TOGGLE FULLSCREEN IMAGE
window.addEventListener("DOMContentLoaded", () => {
  // (A) GET ALL IMAGES
  var all = document.querySelectorAll(".gallery img");

  // (B) CLICK ON IMAGE TO TOGGLE FULLSCREEN
  if (all.length>0) { for (let img of all) {
    img.onclick = () => img.classList.toggle("full");
  }}
});- On window load, get all the gallery images.
- On clicking the image, toggle the
.fullCSS class – This will show the image in fullscreen.
EXTRAS
That’s it for all the code. Here are some extras that may be useful to you.
EXTRA) FILENAME AS IMAGE CAPTION
foreach ($images as $i) {
  $img = basename($i);
  $caption = substr($img, 0, strrpos($img, "."));
  printf("<figure><img src='gallery/%s'><figcaption>%s</figcaption></figure>",
    rawurlencode($img), $caption
  );
}
Since there is no database, there is nowhere we can store the captions. But we can still use the file name as the caption of the images – This is just a small modification to the PHP to also output the <figcaption>.
EXTRA) SORTING THE IMAGES
usort($images, function ($file1, $file2) {
  return filemtime($file2) <=> filemtime($file1);
});usort($images, function ($file1, $file2) {
return filemtime($file1) <=> filemtime($file2);
});sort($images); // low to high
rsort($images); // high to low
EXTRA) MULTIPLE CATEGORIES & FOLDERS
<h1>CATEGORY A</h1>
<div class="gallery"><?php
  $images = glob(FOLDER A);
  foreach ($images as $i) { printf("<img src='FOLDER A...'>"); }
?></div>

<h1>CATEGORY B</h1>
<div class="gallery"><?php
  $images = glob(FOLDER B);
  foreach ($images as $i) { printf("<img src='FOLDER B...'>"); }
?></div>
Just put your images into different category folders, and repeat the “get list of files and output HTML”. Of course, this is good as a “quick fix” only. Not recommended if you have a dozen folders.
EXTRA) INCLUDE VIDEOS
// (A) GET IMAGES & VIDEOS
$media = glob("$dir*.{jpg,jpeg,gif,png,bmp,webp,avi,mp4}", GLOB_BRACE);

// (B) OUTPUT HTML
foreach ($media as $i) {
  $parts = pathinfo($i);
  if ($parts["extension"]=="avi" || $parts["extension"]=="mp4") {
    printf("<video src='gallery/%s' controls></video>", basename($i));
  } else { printf("<img src='gallery/%s'>", basename($i)); }
}
But the problem is – How to deal with video playback. Play while in the thumbnail size? Or engage in full-screen mode first? Check out the video gallery tutorial below if you want more.
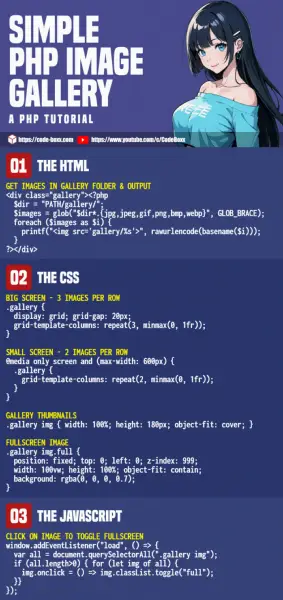
INFOGRAPHIC CHEATSHEET

COMPATIBILITY CHECKS
- Arrow Functions – CanIUse
- CSS Grid – CanIUse
- Transition – CanIUse
This simple gallery will work on any modern browser.
USEFUL LINKS
- Simple PHP Video Gallery – Code Boxx
- Very Simple Responsive Image Gallery (Pure HTML CSS) – Code Boxx
- Simple Javascript CSS Slideshow – Code Boxx
THE END
Thank you for reading, and we have come to the end of this short tutorial. I hope that it has helped you to create a better (and simpler) image gallery, and if you have anything to share with this guide, please feel free to comment below. Good luck and happy coding!

i really like this code, thanks for posting it. how would one put an image counter?
<?=count($images)?>mega frajda, supcio