Welcome to a tutorial on how to create a seat reservation system with Python Flask and SQLite. Want to create a simple reservation page without all those crazy Django and database stuff? Well, here’s a quick example that I have made for beginners – Read on!
TABLE OF CONTENTS
DOWNLOAD & NOTES
Here is the download link to the example code, so you don’t have to copy-paste everything.
EXAMPLE CODE DOWNLOAD
Just click on “download zip” or do a git clone. I have released it under the MIT license, so feel free to build on top of it or use it in your own project.
SORRY FOR THE ADS...
But someone has to pay the bills, and sponsors are paying for it. I insist on not turning Code Boxx into a "paid scripts" business, and I don't "block people with Adblock". Every little bit of support helps.
Buy Me A Coffee Code Boxx eBooks
PYTHON FLASK SEAT RESERVATION
All right, let us now get into the details of creating a simple seat reservation system with Python Flask and SQLite.
QUICK SETUP
- Create a virtual environment
virtualenv venvand activate it –venv\Scripts\activate(Windows)venv/bin/activate(Linux/Mac) - Install required libraries –
pip install flask - For those who are new, the default Flask folders are –
staticPublic files (JS/CSS/images/videos/audio)templatesHTML pages
STEP 1) THE DATABASE
1A) AVAILABLE SEATS
-- (A) SEATS
CREATE TABLE `seats` (
  `seat_id` TEXT NOT NULL,
  `room_id` TEXT NOT NULL,
  PRIMARY KEY (`seat_id`, `room_id`)
);
First, let us start with the database. This should be pretty self-explanatory, the available seats within the rooms. If you are offering seats on transport, just change room_id to vehicle_id then.
1B) SESSIONS
-- (B) SESSIONS
CREATE TABLE `sessions` (
  `session_id` INTEGER PRIMARY KEY AUTOINCREMENT,
  `room_id` TEXT NOT NULL,
  `session_date` TEXT NOT NULL
);

CREATE INDEX `idx_room_id`
  ON `sessions` (`room_id`);

CREATE INDEX `idx_session_date`
  ON `sessions` (`session_date`);
Next, we have another table to store the sessions (seminars, lessons, lectures, screenings, trips, etc…).
1C) RESERVATIONS
-- (C) RESERVATIONS
CREATE TABLE `reservations` (
  `session_id` INTEGER NOT NULL,
  `seat_id` TEXT NOT NULL,
  `user_id` INTEGER NOT NULL,
  PRIMARY KEY (`session_id`,`seat_id`,`user_id`)
);
Lastly, the reservations table itself ties in “which user reserved which seat, for which session”.
1D) DUMMY DATA
-- (D) DUMMY DATA
-- (D1) DUMMY SEATS
INSERT INTO `seats` (`seat_id`, `room_id`) VALUES
('A1', 'ROOM-A'),
('A2', 'ROOM-A'),
('A3', 'ROOM-A'),
('A4', 'ROOM-A'),
('B1', 'ROOM-A'),
('B2', 'ROOM-A'),
('B3', 'ROOM-A'),
('B4', 'ROOM-A'),
('C1', 'ROOM-A'),
('C2', 'ROOM-A'),
('C3', 'ROOM-A'),
('C4', 'ROOM-A');

-- (D2) DUMMY SESSION
INSERT INTO `sessions` (`session_id`, `room_id`, `session_date`) VALUES
(1, 'ROOM-A', '2077-06-05 08:00:00');

-- (D3) DUMMY RESERVATION
INSERT INTO `reservations` (`session_id`, `seat_id`, `user_id`) VALUES
('1', 'B2', '555'),
('1', 'A4', '888');
For you guys who are still confused, maybe some dummy data will better explain things.
- We have a single
ROOM-Ahere with 12 seats, fromA1toC4. - A session is set to happen in Cyberpunk 2077 at
ROOM-A. - User 555 made a reservation for seat B2, and user 888 made a reservation for A4.
1E) CREATE THE DATABASE
# (A) LOAD PACKAGES
import sqlite3, os
from sqlite3 import Error

# (B) DATABASE + SQL FILE
DBFILE = "seats.db"
SQLFILE = "S1A_database.sql"

# (C) DELETE OLD DATABASE IF EXIST
if os.path.exists(DBFILE):
  os.remove(DBFILE)

# (D) IMPORT SQL
conn = sqlite3.connect(DBFILE)
with open(SQLFILE) as f:
  conn.executescript(f.read())
conn.commit()
conn.close()
print("Database created!")
Nothing much here, we are just reading the above SQL file and creating the SQLite database itself.
STEP 2) SEAT RESERVATION LIBRARY
# (A) LOAD SQLITE MODULE
import sqlite3
DBFILE = "seats.db"

# (B) HELPER - RUN SQL QUERY
def query(sql, data):
  conn = sqlite3.connect(DBFILE)
  cursor = conn.cursor()
  cursor.execute(sql, data)
  conn.commit()
  conn.close()

# (C) HELPER - FETCH ALL
def select(sql, data=[]):
  conn = sqlite3.connect(DBFILE)
  cursor = conn.cursor()
  cursor.execute(sql, data)
  results = cursor.fetchall()
  conn.close()
  return results

# (D) GET SEATS FOR GIVEN SESSION
def get(sid):
  res = []
  for row in select("""SELECT sa.`seat_id`, r.`user_id` FROM `seats` sa
    LEFT JOIN `sessions` se USING (`room_id`)
    LEFT JOIN `reservations` r USING(`seat_id`)
    WHERE se.`session_id`=?
    ORDER BY sa.`seat_id`""", [sid]):
  res.append(row)
  return res

# (E) SAVE RESERVATION
def save (sid, uid, seats):
  sql = "INSERT INTO `reservations` (`session_id`, `seat_id`, `user_id`) VALUES "
  data = []
  for s in seats:
    sql += "(?,?,?),"
    data.append(sid)
    data.append(s)
    data.append(uid)
  sql = sql[:-1]
  query(sql, data)
  return True
With the database in place, the next step is to create a library to work with it. Looks complicated, but keep calm and study closely.
- (A) Load the SQLite module. Captain Obvious at your service.
- (B & C)
query()Helper function to run an SQL query.select()Helper function to run a SELECT query. - (D)
get()Get the seats for a given session. - (E)
save()Save seat reservation.
That’s all. Feel free to add more of your own functions.
STEP 3) FLASK SERVER
# (A) INIT
# (A1) LOAD MODULES
from flask import Flask, render_template, request, make_response
import S2_seat_lib as seatr
import json

# (A2) FLASK SETTINGS + INIT
HOST_NAME = "localhost"
HOST_PORT = 80
app = Flask(__name__)
# app.debug = True

# (A3) FIXED SESSION & USER ID FOR THIS DEMO
uid = 999
sid = 1

# (B) FEEDBACK HTML PAGE
@app.route("/")
def index():
  # (B1) GET SEATS
  seats = seatr.get(sid)

  # (B2) RENDER HTML PAGE
  return render_template("S4A_seats.html", seats=seats)

# (C) SAVE RESERVATION
@app.route("/save", methods=["POST"])
def save():
  data = dict(request.form)
  seats = json.loads(data["seats"])
  seatr.save(sid, uid, seats)
  return make_response("OK", 200)

# (D) START
if __name__ == "__main__":
  app.run(HOST_NAME, HOST_PORT)
Not going to explain this line-by-line, but the essentials:
- (B) Get the seats from the database, and pass them into the HTML template.
- (C) Handle the “save reservation” request when the HTML form is submitted.
STEP 4) RESERVATION PAGE
4A) THE HTML
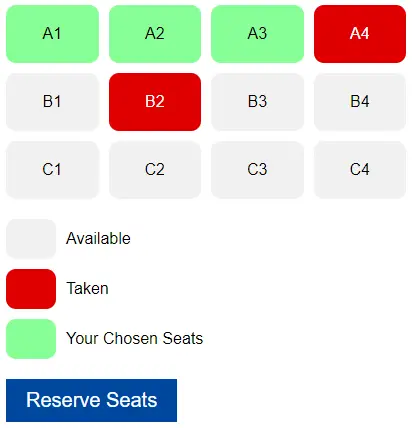
<!-- (B) SEAT LAYOUT -->
<div id="layout">
  {% for seat in seats %}
  <div
    {% if seat[1] is none %}
    class="seat" onclick="reserve.toggle(this)"
    {% else %}
    class="seat taken"
    {% endif %}
  >{{ seat[0] }}</div>
  {% endfor %}
</div>

<!-- (C) LEGEND -->
<div id="legend">
  <div class="seat"></div> <div class="txt">Available</div>
  <div class="seat taken"></div> <div class="txt">Taken</div>
  <div class="seat selected"></div> <div class="txt">Your Chosen Seats</div>
</div>

<!-- (D) SAVE SELECTION -->
<button id="save" onclick="reserve.save()">Reserve Seats</button>
No need to panic, the important part here is quite literally (B) and (D). The user simply clicks on seats to choose them, then hits “save” to complete the reservation.
4B) THE JAVASCRIPT
var reserve = {
  // (A) CHOOSE THIS SEAT
  toggle : seat => seat.classList.toggle("selected"),

  // (B) SAVE RESERVATION
  save : () => {
    // (B1) GET SELECTED SEATS
    let selected = document.querySelectorAll("#layout .selected");

    // (B2) ERROR!
    if (selected.length == 0) { alert("No seats selected."); }

    // (B3) SELECTED SEATS
    else {
      // (B3-1) GET SELECTED SEAT NUMBERS
      let seats = [];
      for (let s of selected) { seats.push(s.innerHTML); }

      // (B3-2) SEND TO SERVER
      let data = new FormData();
      data.append("seats", JSON.stringify(seats));
      data.append("KEY", "VALUE"); // add more data as required
      fetch("/save", {
        method: "POST",
        body : data
      })
      .then(res => res.text())
      .then(txt => {
        // DO WHATEVER IS REQUIRED
        // SEND CUSTOMER TO THANK YOU PAGE?
        // PAYMENT FIRST?
        alert(txt);
      });
    }
  }
};
Once again, no need to panic…
- When the user clicks on a
<div class="seat">, we simply toggle aselectedCSS class on it. - To get all the selected seats, we simply do a
querySelectorAll(".selected"). Then, send the selected seats to the server/savefor processing. The end.
EXTRAS
That’s all for the tutorial, and here is a small section on some extras and links that may be useful to you.
PLENTY OF IMPROVEMENTS TO DO
Before the trolls start with their usual “this is so dumb and stupid” – Of course, this is only a barebones example and starting point. There are plenty of things that need to be addressed.
- SQLite is a great tool for learning, but it is better to use a “full-fledged database” in production – PostgreSQL, MySQL, Redis, or MongoDB.
- If you are planning to open the reservation for registered users, tie this in with your existing user system.
- If going public, add your own anti-spam measures (captcha, pay before confirmation, phone number confirmation, etc…).
- Tie up with payment systems.
- Complete the “checkout” sequence – Send a notification email? SMS notification? Click on a link in the email to confirm?
Yep, it is a different process for everyone. So it is up to you to complete your own system.
LINKS & REFERENCES
- Python Flask
- SQLite
- Javascript Seat Reservation – Code Boxx
THE END
Thank you for reading, and we have come to the end. I hope that it has helped you to better understand, and if you want to share anything with this guide, please feel free to comment below. Good luck and happy coding!